What's next, well I havbe to pay off my internet account from xmasd, severly depressing time of the year, ahead of birthdays and fathersday.
I usually have copious amounts of wine in store for these occasaions.
And the bloody flies & ants, That's queensland, as a good taoist I allow them to live!
Next up after I finish paying Vodafone their exorbitant costs, I wish to buy an amplifier.
In Particular... http://evatco.com.au/sonic.hthl this one.
It's a kit, and has all the parts I need to add to the build of the "dually" (Juily-attributed to some girlfriends) ,
I designed. (markedly, this means a preamp with inserts,) and all the parts to support my design of a preamp. I still have work to do, as in the switcher, I want to do digital, so it's fast. Momentary. I don't want to wait half a secong for the new patch to be run, or else, have it morf to the new sounbd rather than taking a second to switch. Elrectronically speakinbg. I'm sure it's been done B4,
But I want to figure it out before I choose!
What to go with...
I want an amp that screams it's head off at low volumes, but not just a Fender champ preamp with insert sockets.
23 November 2018


07 February 2011
So many people get confused with sports and real fighting (In the moment).
Check out these vids for an inside look. youtube vids
http://www.youtube.com/watch?v=GtRYrchFCFI # my sifu (Paul Brennan)'s sifu, Ip Shui.
http://www.youtube.com/watch?v=n6mDkP9mjBU&NR=1 # My current sigung, SiGungs Son, Ip Shee Kung
just to give you some idea, it's far removed from five/eight antagonise tactics of rugby in the old days.
have another look, check if you recognise anything.,
With My housen mate Sean, I also notice the Capoeira foot work, and the "Talking with Hands"
rek. https://secure.wikimedia.org/wikipedia/en/wiki/Capoeira
2 step method, step forward, step back, with the intent of moving forward.
Trouble is, "Mind and Will Boxing" Disregards all these things.
ref. http://www.tonglong.co.uk/index.php?categoryid=33
Yip Shui defeated all comers and truly established his position
You can find some pics/utube novies of your si gung here.
https://encrypted.google.com/search?q=Ip+Chee+Kung&hl=en&client=firefox-a&hs=wrR&rls=com.mandriva:en-US:unofficial&prmd=ivns&source=univ&tbs=vid:1&tbo=u&ei=DfJPTdzfGMvXca_B_MUL&sa=X&oi=video_result_group&ct=title&resnum=1&ved=0CBkQqwQwAA
Malcome and Henry learned from Dr Nat Yeun (spelling), Dr Nat Learned from Ip Shui
Ip Shui page, http://www.chowgarsouthernmantis.com/yipshui.php
ref. http://www.tonglong.co.uk/index.php?categoryid=33
In Brisbane you may learn and train Tong Long with Sifu Paul Brennan (healer/Instructor).
If you like another snake style, Wing Chun, then check out Lo Man Cam's web page.
Highly enlightening wed pages.
Regards Glenn
Check out these vids for an inside look. youtube vids
http://www.youtube.com/watch?v=GtRYrchFCFI # my sifu (Paul Brennan)'s sifu, Ip Shui.
http://www.youtube.com/watch?v=n6mDkP9mjBU&NR=1 # My current sigung, SiGungs Son, Ip Shee Kung
just to give you some idea, it's far removed from five/eight antagonise tactics of rugby in the old days.
have another look, check if you recognise anything.,
With My housen mate Sean, I also notice the Capoeira foot work, and the "Talking with Hands"
rek. https://secure.wikimedia.org/wikipedia/en/wiki/Capoeira
2 step method, step forward, step back, with the intent of moving forward.
Trouble is, "Mind and Will Boxing" Disregards all these things.
ref. http://www.tonglong.co.uk/index.php?categoryid=33
Yip Shui defeated all comers and truly established his position
You can find some pics/utube novies of your si gung here.
https://encrypted.google.com/search?q=Ip+Chee+Kung&hl=en&client=firefox-a&hs=wrR&rls=com.mandriva:en-US:unofficial&prmd=ivns&source=univ&tbs=vid:1&tbo=u&ei=DfJPTdzfGMvXca_B_MUL&sa=X&oi=video_result_group&ct=title&resnum=1&ved=0CBkQqwQwAA
Malcome and Henry learned from Dr Nat Yeun (spelling), Dr Nat Learned from Ip Shui
Ip Shui page, http://www.chowgarsouthernmantis.com/yipshui.php
ref. http://www.tonglong.co.uk/index.php?categoryid=33
In Brisbane you may learn and train Tong Long with Sifu Paul Brennan (healer/Instructor).
If you like another snake style, Wing Chun, then check out Lo Man Cam's web page.
Highly enlightening wed pages.
Regards Glenn
29 January 2011
Flood damage
I'm pleased to say my relatives from the Lochyer Valley all survived without rain damage, maybe someone is looking down on us (as they believe). But I see that some of the Plainlands crew and Gatton ppl have been bypassed by this honorific event.
All the best to you and yours, Glenn
All the best to you and yours, Glenn
wondering why my house mate behaves like a Halfback,
...trying to get away with anything!
I'm afraid Sean is trying to det me up.
He continually invades my personal space.
He continually calls ma by derogative names. (accentuating vowels to some extreme sound.)
I'm doing my best to satisfy his demands, but I'm also losing patience.
Even after I have explained my position, he prefers , it seems, to use that as an admission of defeat/guilt or of compliance).
I'm at a loss ...
What do I do?
I'm afraid Sean is trying to det me up.
He continually invades my personal space.
He continually calls ma by derogative names. (accentuating vowels to some extreme sound.)
I'm doing my best to satisfy his demands, but I'm also losing patience.
Even after I have explained my position, he prefers , it seems, to use that as an admission of defeat/guilt or of compliance).
I'm at a loss ...
What do I do?
03 January 2011
Mandriva sudoers file has changed :-)
Mandriva sudoers file has changed, I can't speak for other distros, but after my post about setting up sudo with mandriva, and using zsh (z-shell) for cli shortcuts/aliasing.
Now most of that aliasing can be configured in sudoers instead, so it wont matter what shell you use.
Believe me, I am no shell expert, I use and study the zshell, (because I've been using it for soo long) because of some shell function, mostly date and time, user name and pwd (present working directory) in colour(!) a la knoppix live distribution.
anyway, now with out being a bash guru,
I should be able to set my system up to do most of the day to day admin stuff
with sudo, instead of shell alias's.
the old and new files look like this.
3 files, ~/.zshrc, the new /etc/sudoers file and the old /etc/sudoers file.
the new /etc/sudoers file,
[code]
## Sudoers allows particular users to run various commands as
## the root user, without needing the root password.
##
## Examples are provided at the bottom of the file for collections
## of related commands, which can then be delegated out to particular
## users or groups.
##
## This file must be edited with the 'visudo' command.
## Host Aliases
## Groups of machines. You may prefer to use hostnames (perhaps using
## wildcards for entire domains) or IP addresses instead.
# Host_Alias FILESERVERS = fs1, fs2
# Host_Alias MAILSERVERS = smtp, smtp2
## User Aliases
## These aren't often necessary, as you can use regular groups
## (ie, from files, LDAP, NIS, etc) in this file - just use %groupname
## rather than USERALIAS
# User_Alias ADMINS = jsmith, mikem
## Command Aliases
## These are groups of related commands...
## Networking
# Cmnd_Alias NETWORKING = /sbin/route, /sbin/ifconfig, /bin/ping, /sbin/dhclient, /usr/bin/net, /sbin/iptables, /usr/bin/rfcomm, /usr/bin/wvdial, /sbin/iwconfig, /sbin/mii-tool
## Installation and management of software
# Cmnd_Alias SOFTWARE = /bin/rpm, /usr/bin/up2date, /usr/bin/yum
## Services
# Cmnd_Alias SERVICES = /sbin/service, /sbin/chkconfig
## Updating the locate database
# Cmnd_Alias LOCATE = /usr/bin/updatedb
## Storage
# Cmnd_Alias STORAGE = /sbin/fdisk, /sbin/sfdisk, /sbin/parted, /sbin/partprobe, /bin/mount, /bin/umount
## Delegating permissions
# Cmnd_Alias DELEGATING = /usr/sbin/visudo, /bin/chown, /bin/chmod, /bin/chgrp
## Processes
# Cmnd_Alias PROCESSES = /bin/nice, /bin/kill, /usr/bin/kill, /usr/bin/killall
## Drivers#
Cmnd_Alias DRIVERS = /sbin/modprobe
# Defaults specification
#
# Disable "ssh hostname sudo", because it will show the password in clear.
# You have to run "ssh -t hostname sudo".
#
Defaults requiretty
Defaults env_reset
Defaults env_keep = "COLORS DISPLAY HOSTNAME HISTSIZE INPUTRC KDEDIR LS_COLORS"
Defaults env_keep += "MAIL PS1 PS2 QTDIR USERNAME LANG LC_ADDRESS LC_CTYPE"
Defaults env_keep += "LC_COLLATE LC_IDENTIFICATION LC_MEASUREMENT LC_MESSAGES"
Defaults env_keep += "LC_MONETARY LC_NAME LC_NUMERIC LC_PAPER LC_TELEPHONE"
Defaults env_keep += "LC_TIME LC_ALL LANGUAGE LINGUAS _XKB_CHARSET XAUTHORITY"
Defaults secure_path = /sbin:/bin:/usr/sbin:/usr/bin
## Next comes the main part: which users can run what software on
## which machines (the sudoers file can be shared between multiple
## systems).
## Syntax:
##
## user MACHINE=COMMANDS
##
## The COMMANDS section may have other options added to it.
##
## Allow root to run any commands anywhere
root ALL=(ALL) ALL
## Allows members of the 'sys' group to run networking, software,
## service management apps and more.
# %sys ALL = NETWORKING, SOFTWARE, SERVICES, STORAGE, DELEGATING, PROCESSES, LOCATE, DRIVERS
## Allows people in group wheel to run all commands
%wheel ALL=(ALL) ALL
## Same thing without a password
%wheel ALL=(ALL) NOPASSWD: ALL
## Allows members of the users group to mount and unmount the
## cdrom as root
%users ALL=/sbin/mount /mnt/cdrom, /sbin/umount /mnt/cdrom
## Allows members of the users group to shutdown this system
%users localhost=/sbin/shutdown -h now
## Read drop-in files from /etc/sudoers.d (the # here does not mean a comment)
#includedir /etc/sudoers.d
[/code]
the old style /etc/sudoers file,
[code]
# sudoers file.
#
# This file MUST be edited with the 'visudo' command as root.
# Failure to use 'visudo' may result in syntax or file permission errors
# that prevent sudo from running.
#
# See the sudoers man page for the details on how to write a sudoers file.
#
# Host alias specification
# User alias specification
# Cmnd alias specification
# Defaults specification
# Runas alias specification
# User privilege specification
root ALL=(ALL) ALL
# Uncomment to allow people in group wheel to run all commands
%wheel ALL=(ALL) ALL
# Same thing without a password
%wheel ALL=(ALL) NOPASSWD: ALL
# Samples
%users ALL=/sbin/mount /cdrom,/sbin/umount /cdrom
%users localhost=/sbin/shutdown -h now
[/code]
zshrc,
[code]
# Lines configured by zsh-newuser-install(before being hacked)
HISTFILE=~/.histfile
HISTSIZE=1000000
SAVEHIST=600000
setopt appendhistory beep extendedglob nomatch notify
#bindkey -v #set below
# End of lines configured by zsh-newuser-install
# The following lines were added by compinstall
zstyle :compinstall filename '/home/glenn/.zshrc'
autoload -Uz compinit
compinit
# End of lines added by compinstall
#
# .zshrc file for zsh 4.0
#
# .zshrc is sourced in interactive shells. It
# should contain commands to set up aliases, functions,
# options, key bindings, etc.
#
# Set a colour prompt # home by wilsontc modified and adopted 1st-oct2008 GlennsPref
autoload colors zsh/terminfo
if [[ "$terminfo[colors]" -ge 8 ]]; then
colors
fi
for color in RED GREEN YELLOW BLUE MAGENTA CYAN WHITE; do
eval PR_$color='%{$terminfo[bold]$fg[${(L)color}]%}'
eval PR_LIGHT_$color='%{$fg[${(L)color}]%}'
(( count = $count + 1 ))
done
PR_NO_COLOR="%{$terminfo[sgr0]%}"
if [ `whoami` = 'root' ]; then
PS1="$PR_RED%n$PR_NO_COLOR@$PR_BLUE%m%u$PR_NO_COLOR:$PR_CYAN%2c$PR_NO_COLOR%(!.#.$) "
else
PS1="$PR_GREEN%n$PR_NO_COLOR@$PR_BLUE%m%u$PR_NO_COLOR:$PR_CYAN%2c$PR_NO_COLOR%(!.#.$) "
fi
# Put a clock on the right hand prompt
RPS1="$PR_CYAN(%D{%d-%m %H:%M})$PR_NO_COLOR"
# Search path for the cd command
cdpath=(.. ~ ~/src ~/zsh)
# Use hard limits, except for a smaller stack and no core dumps
unlimit
limit stack 8192
limit core 0
limit -s
# Set up aliases # to get root access via sudo instead of "access denied"
alias su='su -p'
alias man='sudo man'
alias cat='sudo cat'
alias locate='sudo locate'
alias lsusb -v='sudo lsusb -v'
alias lsusb='sudo lsusb'
alias lsmod='sudo lsmod'
alias lspci -v='sudo lspci -v'
alias lspci='sudo lspci'
alias fw-reset='sudo fw-reset'
alias service='sudo service'
alias netstat='sudo netstat -anu'
alias fslint='sudo /usr/bin/fslint-gui'
alias organise-rpms= 'sh ~/build/rpms/organise-rpms'
alias gen-hdlist2= 'sh ~/build/rpms/gen-hdlist2'
alias smart='sudo smart'
alias ifup='sudo ifup'
alias ifdown='sudo ifdown'
alias ifconfig='sudo ifconfig'
alias updatedb='sudo updatedb'
alias rpm='sudo rpm'
alias urpmi.update='sudo urpmi.update'
alias urpmi='sudo urpmi --noclean'
alias urpme='sudo urpme'
alias mv='nocorrect mv' # no spelling correction on mv
alias cp='nocorrect cp' # no spelling correction on cp
alias mkdir='nocorrect mkdir' # no spelling correction on mkdir
#alias j=jobs
#alias pu=pushd
#alias po=popd
#alias d='dirs -v'
#alias h=history
alias ll='ls -l'
alias la='ls -a'
alias top='htop'
alias mount='sudo mount'
alias umount='sudo umount'
alias mbmon='sudo mbmon'
alias make='sudo make'
# List only directories and symbolic
# links that point to directories
alias lsd='ls -ld *(-/DN)'
# List only file beginning with "."
alias lsa='ls -ld .*'
# Shell functions
setenv() { typeset -x "${1}${1:+=}${(@)argv[2,$#]}" } # csh compatibility
freload() { while (( $# )); do; unfunction $1; autoload -U $1; shift; done }
# Where to look for autoloaded function definitions
fpath=($fpath ~/.zfunc)
# Autoload all shell functions from all directories in $fpath (following
# symlinks) that have the executable bit on (the executable bit is not
# necessary, but gives you an easy way to stop the autoloading of a
# particular shell function). $fpath should not be empty for this to work.
for func in $^fpath/*(N-.x:t); autoload $func
# automatically remove duplicates from these arrays
typeset -U path cdpath fpath manpath
manpath=($X11HOME/man /usr/man /usr/lang/man /usr/local/man)
export MANPATH
# Hosts to use for completion (see later zstyle)
hosts=(`hostname` ftp.math.gatech.edu prep.ai.mit.edu wuarchive.wustl.edu)
# Some environment variables
export MAIL=/var/spool/mail/$USERNAME
export LESS=-cex3M
export HELPDIR=/usr/local/lib/zsh/help # directory for run-help function to find docs
#oops, I created this, sudo man zshbuiltins | col -bx | perl /usr/share/zsh/4.3.10/Utils/helpfiles GW. (broken 24/11/2010)
#export PATH=$PATH:$HOME/bin #$PATH:$HOME/build/rpms
export PATH=/usr/local/bin:.:/home/glenn/bin:/home/glenn/build:/home/glenn/build/rpms:/usr/X11R6/bin/:/usr/games:/usr/bin:/bin:/usr/lib/qt4/bin
#HISTSIZE=90000
DIRSTACKSIZE=30
# Watch for my friends
#watch=( $(<~/.friends) ) # watch for people in .friends file
#y
watch=(notme) # watch for everybody but me
LOGCHECK=300 # check every 5 min for login/logout activity
WATCHFMT='%n %a %l from %m at %t.'
# Set/unset shell options
#setopt notify globdots correct pushdtohome cdablevars autolist
#setopt appendhistory beep extendedglob nomatch notify
setopt correctall autocd recexact longlistjobs
setopt autoresume histignoredups pushdsilent noclobber
setopt autopushd pushdminus extendedglob rcquotes
unsetopt bgnice autoparamslash
# Autoload zsh modules when they are referenced
zmodload -a zsh/stat stat
zmodload -a zsh/zpty zpty
zmodload -a zsh/zprof zprof
zmodload -ap zsh/mapfile mapfile
bindkey -v # vi key bindings
# bindkey -e # emacs key bindings
bindkey ' ' magic-space # also do history expansion on space
bindkey '^I' complete-word # complete on tab, leave expansion to _expand
# Setup new style completion system. To see examples of the old style (compctl
# based) programmable completion, check Misc/compctl-examples in the zsh
# distribution.
#autoload -U compinit # repeated above, removed for test 24/11/2010
#compinit # repeated above, removed for test 24/11/2010
# Completion Styles
# Enabling Caching
zstyle ':completion:*' use-cache on
zstyle ':completion:*' cache-path ~/.zsh/cache
# list of completers to use
zstyle ':completion:*::::' completer _expand _complete _ignored _approximate
# allow one error for every three characters typed in approximate completer
zstyle -e ':completion:*:approximate:*' max-errors \
'reply=( $(( ($#PREFIX+$#SUFFIX)/3 )) numeric )'
# insert all expansions for expand completer
zstyle ':completion:*:expand:*' all-expansions tag-order
# formatting and messages
zstyle ':completion:*' verbose yes
zstyle ':completion:*:descriptions' format '%B%d%b'
zstyle ':completion:*:messages' format '%d'
zstyle ':completion:*:warnings' format 'No matches for: %d'
zstyle ':completion:*:corrections' format '%B%d (errors: %e)%b'
zstyle ':completion:*' group-name ''
# match uppercase from lowercase
zstyle ':completion:*' matcher-list 'm:{a-z}={A-Z}'
# offer indexes before parameters in subscripts
zstyle ':completion:*:*:-subscript-:*' parameters tag-order indexes
# command for process lists, the local web server details and host completion
zstyle ':completion:*:processes' command 'ps -o pid,s,nice,stime,args'
zstyle ':completion:*:urls' local 'www' '/var/www/htdocs' 'public_html'
zstyle '*' hosts $hosts
# Filename suffixes to ignore during completion (except after rm command)
zstyle ':completion:*:*:(^rm):*:*files' ignored-patterns '*?.o' '*?.c~' \
'*?.old' '*?.pro'
# the same for old style completion
fignore=(.o .c~ .old .pro)
# ignore completion functions (until the _ignored completer)
zstyle ':completion:*:functions' ignored-patterns '_*'
[/code]
Not sure if you can see it, but I see a whole lot of aliases I don't need anymore and they work on bash too.
I'm due to review my zsh aliases and sudo configuration files.
cheers for now.
Regards Glenn
Now most of that aliasing can be configured in sudoers instead, so it wont matter what shell you use.
Believe me, I am no shell expert, I use and study the zshell, (because I've been using it for soo long) because of some shell function, mostly date and time, user name and pwd (present working directory) in colour(!) a la knoppix live distribution.
anyway, now with out being a bash guru,
I should be able to set my system up to do most of the day to day admin stuff
with sudo, instead of shell alias's.
the old and new files look like this.
3 files, ~/.zshrc, the new /etc/sudoers file and the old /etc/sudoers file.
the new /etc/sudoers file,
[code]
## Sudoers allows particular users to run various commands as
## the root user, without needing the root password.
##
## Examples are provided at the bottom of the file for collections
## of related commands, which can then be delegated out to particular
## users or groups.
##
## This file must be edited with the 'visudo' command.
## Host Aliases
## Groups of machines. You may prefer to use hostnames (perhaps using
## wildcards for entire domains) or IP addresses instead.
# Host_Alias FILESERVERS = fs1, fs2
# Host_Alias MAILSERVERS = smtp, smtp2
## User Aliases
## These aren't often necessary, as you can use regular groups
## (ie, from files, LDAP, NIS, etc) in this file - just use %groupname
## rather than USERALIAS
# User_Alias ADMINS = jsmith, mikem
## Command Aliases
## These are groups of related commands...
## Networking
# Cmnd_Alias NETWORKING = /sbin/route, /sbin/ifconfig, /bin/ping, /sbin/dhclient, /usr/bin/net, /sbin/iptables, /usr/bin/rfcomm, /usr/bin/wvdial, /sbin/iwconfig, /sbin/mii-tool
## Installation and management of software
# Cmnd_Alias SOFTWARE = /bin/rpm, /usr/bin/up2date, /usr/bin/yum
## Services
# Cmnd_Alias SERVICES = /sbin/service, /sbin/chkconfig
## Updating the locate database
# Cmnd_Alias LOCATE = /usr/bin/updatedb
## Storage
# Cmnd_Alias STORAGE = /sbin/fdisk, /sbin/sfdisk, /sbin/parted, /sbin/partprobe, /bin/mount, /bin/umount
## Delegating permissions
# Cmnd_Alias DELEGATING = /usr/sbin/visudo, /bin/chown, /bin/chmod, /bin/chgrp
## Processes
# Cmnd_Alias PROCESSES = /bin/nice, /bin/kill, /usr/bin/kill, /usr/bin/killall
## Drivers#
Cmnd_Alias DRIVERS = /sbin/modprobe
# Defaults specification
#
# Disable "ssh hostname sudo
# You have to run "ssh -t hostname sudo
#
Defaults requiretty
Defaults env_reset
Defaults env_keep = "COLORS DISPLAY HOSTNAME HISTSIZE INPUTRC KDEDIR LS_COLORS"
Defaults env_keep += "MAIL PS1 PS2 QTDIR USERNAME LANG LC_ADDRESS LC_CTYPE"
Defaults env_keep += "LC_COLLATE LC_IDENTIFICATION LC_MEASUREMENT LC_MESSAGES"
Defaults env_keep += "LC_MONETARY LC_NAME LC_NUMERIC LC_PAPER LC_TELEPHONE"
Defaults env_keep += "LC_TIME LC_ALL LANGUAGE LINGUAS _XKB_CHARSET XAUTHORITY"
Defaults secure_path = /sbin:/bin:/usr/sbin:/usr/bin
## Next comes the main part: which users can run what software on
## which machines (the sudoers file can be shared between multiple
## systems).
## Syntax:
##
## user MACHINE=COMMANDS
##
## The COMMANDS section may have other options added to it.
##
## Allow root to run any commands anywhere
root ALL=(ALL) ALL
## Allows members of the 'sys' group to run networking, software,
## service management apps and more.
# %sys ALL = NETWORKING, SOFTWARE, SERVICES, STORAGE, DELEGATING, PROCESSES, LOCATE, DRIVERS
## Allows people in group wheel to run all commands
%wheel ALL=(ALL) ALL
## Same thing without a password
%wheel ALL=(ALL) NOPASSWD: ALL
## Allows members of the users group to mount and unmount the
## cdrom as root
%users ALL=/sbin/mount /mnt/cdrom, /sbin/umount /mnt/cdrom
## Allows members of the users group to shutdown this system
%users localhost=/sbin/shutdown -h now
## Read drop-in files from /etc/sudoers.d (the # here does not mean a comment)
#includedir /etc/sudoers.d
[/code]
the old style /etc/sudoers file,
[code]
# sudoers file.
#
# This file MUST be edited with the 'visudo' command as root.
# Failure to use 'visudo' may result in syntax or file permission errors
# that prevent sudo from running.
#
# See the sudoers man page for the details on how to write a sudoers file.
#
# Host alias specification
# User alias specification
# Cmnd alias specification
# Defaults specification
# Runas alias specification
# User privilege specification
root ALL=(ALL) ALL
# Uncomment to allow people in group wheel to run all commands
%wheel ALL=(ALL) ALL
# Same thing without a password
%wheel ALL=(ALL) NOPASSWD: ALL
# Samples
%users ALL=/sbin/mount /cdrom,/sbin/umount /cdrom
%users localhost=/sbin/shutdown -h now
[/code]
zshrc,
[code]
# Lines configured by zsh-newuser-install
HISTFILE=~/.histfile
HISTSIZE=1000000
SAVEHIST=600000
setopt appendhistory beep extendedglob nomatch notify
#bindkey -v #set below
# End of lines configured by zsh-newuser-install
# The following lines were added by compinstall
zstyle :compinstall filename '/home/glenn/.zshrc'
autoload -Uz compinit
compinit
# End of lines added by compinstall
#
# .zshrc file for zsh 4.0
#
# .zshrc is sourced in interactive shells. It
# should contain commands to set up aliases, functions,
# options, key bindings, etc.
#
# Set a colour prompt # home by wilsontc modified and adopted 1st-oct2008 GlennsPref
autoload colors zsh/terminfo
if [[ "$terminfo[colors]" -ge 8 ]]; then
colors
fi
for color in RED GREEN YELLOW BLUE MAGENTA CYAN WHITE; do
eval PR_$color='%{$terminfo[bold]$fg[${(L)color}]%}'
eval PR_LIGHT_$color='%{$fg[${(L)color}]%}'
(( count = $count + 1 ))
done
PR_NO_COLOR="%{$terminfo[sgr0]%}"
if [ `whoami` = 'root' ]; then
PS1="$PR_RED%n$PR_NO_COLOR@$PR_BLUE%m%u$PR_NO_COLOR:$PR_CYAN%2c$PR_NO_COLOR%(!.#.$) "
else
PS1="$PR_GREEN%n$PR_NO_COLOR@$PR_BLUE%m%u$PR_NO_COLOR:$PR_CYAN%2c$PR_NO_COLOR%(!.#.$) "
fi
# Put a clock on the right hand prompt
RPS1="$PR_CYAN(%D{%d-%m %H:%M})$PR_NO_COLOR"
# Search path for the cd command
cdpath=(.. ~ ~/src ~/zsh)
# Use hard limits, except for a smaller stack and no core dumps
unlimit
limit stack 8192
limit core 0
limit -s
# Set up aliases # to get root access via sudo instead of "access denied"
alias su='su -p'
alias man='sudo man'
alias cat='sudo cat'
alias locate='sudo locate'
alias lsusb -v='sudo lsusb -v'
alias lsusb='sudo lsusb'
alias lsmod='sudo lsmod'
alias lspci -v='sudo lspci -v'
alias lspci='sudo lspci'
alias fw-reset='sudo fw-reset'
alias service='sudo service'
alias netstat='sudo netstat -anu'
alias fslint='sudo /usr/bin/fslint-gui'
alias organise-rpms= 'sh ~/build/rpms/organise-rpms'
alias gen-hdlist2= 'sh ~/build/rpms/gen-hdlist2'
alias smart='sudo smart'
alias ifup='sudo ifup'
alias ifdown='sudo ifdown'
alias ifconfig='sudo ifconfig'
alias updatedb='sudo updatedb'
alias rpm='sudo rpm'
alias urpmi.update='sudo urpmi.update'
alias urpmi='sudo urpmi --noclean'
alias urpme='sudo urpme'
alias mv='nocorrect mv' # no spelling correction on mv
alias cp='nocorrect cp' # no spelling correction on cp
alias mkdir='nocorrect mkdir' # no spelling correction on mkdir
#alias j=jobs
#alias pu=pushd
#alias po=popd
#alias d='dirs -v'
#alias h=history
alias ll='ls -l'
alias la='ls -a'
alias top='htop'
alias mount='sudo mount'
alias umount='sudo umount'
alias mbmon='sudo mbmon'
alias make='sudo make'
# List only directories and symbolic
# links that point to directories
alias lsd='ls -ld *(-/DN)'
# List only file beginning with "."
alias lsa='ls -ld .*'
# Shell functions
setenv() { typeset -x "${1}${1:+=}${(@)argv[2,$#]}" } # csh compatibility
freload() { while (( $# )); do; unfunction $1; autoload -U $1; shift; done }
# Where to look for autoloaded function definitions
fpath=($fpath ~/.zfunc)
# Autoload all shell functions from all directories in $fpath (following
# symlinks) that have the executable bit on (the executable bit is not
# necessary, but gives you an easy way to stop the autoloading of a
# particular shell function). $fpath should not be empty for this to work.
for func in $^fpath/*(N-.x:t); autoload $func
# automatically remove duplicates from these arrays
typeset -U path cdpath fpath manpath
manpath=($X11HOME/man /usr/man /usr/lang/man /usr/local/man)
export MANPATH
# Hosts to use for completion (see later zstyle)
hosts=(`hostname` ftp.math.gatech.edu prep.ai.mit.edu wuarchive.wustl.edu)
# Some environment variables
export MAIL=/var/spool/mail/$USERNAME
export LESS=-cex3M
export HELPDIR=/usr/local/lib/zsh/help # directory for run-help function to find docs
#oops, I created this, sudo man zshbuiltins | col -bx | perl /usr/share/zsh/4.3.10/Utils/helpfiles GW. (broken 24/11/2010)
#export PATH=$PATH:$HOME/bin #$PATH:$HOME/build/rpms
export PATH=/usr/local/bin:.:/home/glenn/bin:/home/glenn/build:/home/glenn/build/rpms:/usr/X11R6/bin/:/usr/games:/usr/bin:/bin:/usr/lib/qt4/bin
#HISTSIZE=90000
DIRSTACKSIZE=30
# Watch for my friends
#watch=( $(<~/.friends) ) # watch for people in .friends file
#y
watch=(notme) # watch for everybody but me
LOGCHECK=300 # check every 5 min for login/logout activity
WATCHFMT='%n %a %l from %m at %t.'
# Set/unset shell options
#setopt notify globdots correct pushdtohome cdablevars autolist
#setopt appendhistory beep extendedglob nomatch notify
setopt correctall autocd recexact longlistjobs
setopt autoresume histignoredups pushdsilent noclobber
setopt autopushd pushdminus extendedglob rcquotes
unsetopt bgnice autoparamslash
# Autoload zsh modules when they are referenced
zmodload -a zsh/stat stat
zmodload -a zsh/zpty zpty
zmodload -a zsh/zprof zprof
zmodload -ap zsh/mapfile mapfile
bindkey -v # vi key bindings
# bindkey -e # emacs key bindings
bindkey ' ' magic-space # also do history expansion on space
bindkey '^I' complete-word # complete on tab, leave expansion to _expand
# Setup new style completion system. To see examples of the old style (compctl
# based) programmable completion, check Misc/compctl-examples in the zsh
# distribution.
#autoload -U compinit # repeated above, removed for test 24/11/2010
#compinit # repeated above, removed for test 24/11/2010
# Completion Styles
# Enabling Caching
zstyle ':completion:*' use-cache on
zstyle ':completion:*' cache-path ~/.zsh/cache
# list of completers to use
zstyle ':completion:*::::' completer _expand _complete _ignored _approximate
# allow one error for every three characters typed in approximate completer
zstyle -e ':completion:*:approximate:*' max-errors \
'reply=( $(( ($#PREFIX+$#SUFFIX)/3 )) numeric )'
# insert all expansions for expand completer
zstyle ':completion:*:expand:*' all-expansions tag-order
# formatting and messages
zstyle ':completion:*' verbose yes
zstyle ':completion:*:descriptions' format '%B%d%b'
zstyle ':completion:*:messages' format '%d'
zstyle ':completion:*:warnings' format 'No matches for: %d'
zstyle ':completion:*:corrections' format '%B%d (errors: %e)%b'
zstyle ':completion:*' group-name ''
# match uppercase from lowercase
zstyle ':completion:*' matcher-list 'm:{a-z}={A-Z}'
# offer indexes before parameters in subscripts
zstyle ':completion:*:*:-subscript-:*' parameters tag-order indexes
# command for process lists, the local web server details and host completion
zstyle ':completion:*:processes' command 'ps -o pid,s,nice,stime,args'
zstyle ':completion:*:urls' local 'www' '/var/www/htdocs' 'public_html'
zstyle '*' hosts $hosts
# Filename suffixes to ignore during completion (except after rm command)
zstyle ':completion:*:*:(^rm):*:*files' ignored-patterns '*?.o' '*?.c~' \
'*?.old' '*?.pro'
# the same for old style completion
fignore=(.o .c~ .old .pro)
# ignore completion functions (until the _ignored completer)
zstyle ':completion:*:functions' ignored-patterns '_*'
[/code]
Not sure if you can see it, but I see a whole lot of aliases I don't need anymore and they work on bash too.
I'm due to review my zsh aliases and sudo configuration files.
cheers for now.
Regards Glenn
email pranks 2010.
Last year I only had 3 email attempts to fool me into giving up my passwords.
These were sent to my main email address but each one was considered non-authentic.
gmail, yesterday asked for my details for any unused accounts,
no "normal" info, like warnings and what you can disregard, etc...
paypal, 6 weeks ago ask for confirmation of my account details, as they were clearing unused accounts,
and virtualcard, a couple of months before that.
I've not responded to any of these emails, looking very official (without doing a live "a and b comparison") but just from reading them, there was not enough information to convince me they were official.
I might have saved something there, not sure.
These were sent to my main email address but each one was considered non-authentic.
gmail, yesterday asked for my details for any unused accounts,
no "normal" info, like warnings and what you can disregard, etc...
paypal, 6 weeks ago ask for confirmation of my account details, as they were clearing unused accounts,
and virtualcard, a couple of months before that.
I've not responded to any of these emails, looking very official (without doing a live "a and b comparison") but just from reading them, there was not enough information to convince me they were official.
I might have saved something there, not sure.
26 November 2010
The Evolution of MandY
The evolution of Mandriva, or is that Mandrake...? I'm not sure, But I know I find it easy to use and easy to configure. http://mageia.org/en/
From web browsing, file managing, database and/or presentations, to spread-sheets with graphs. It's all here. "Back-up able" and "recoverable". tip; use a filesystem that is recoverable, encrypted or not.
You can decide on a media centric install, or a web-media (rss-wget-rsync) centric, maybe a science centric install......?GlennsPref@gmail.com
Works for me ;) GW
From web browsing, file managing, database and/or presentations, to spread-sheets with graphs. It's all here. "Back-up able" and "recoverable". tip; use a filesystem that is recoverable, encrypted or not.
You can decide on a media centric install, or a web-media (rss-wget-rsync) centric, maybe a science centric install......?GlennsPref@gmail.com
Works for me ;) GW
04 November 2010
Mandriva security and sudo
Mandriva security and sudo, MSEC. GlennsPref@gmail.com
Hi, I've read some discussions here and elsewhere about Mandriva security and the use of sudo.
As well as editing /etc/sudoers, and making yourself ($USER) part of the wheel group, you may require a tighter security than that of the default Mandriva system setup.
Warning! This is a one user system, so some selections may not apply to your system, be careful, if you don't know what a setting does Leave it at the default.
I've been using Mandriva for a few years now, and I generally do these tasks mentioned here, with every update of sudo and the MSEC tool packages.
To be honest I don't know where the config file is for MSEC, and that may be just as well. ;-)
[code]/etc/security/msec[/code]
So to ease my fingers and kb, I have snapshots (.png) of the settings I have made.
After you've done all of this, a reboot is required to put the settings in place, ( like sudo
and group changes).
/etc/sudoers
===========================================================================
# sudoers file.
#
# This file MUST be edited with the 'visudo' command as root.
# Failure to use 'visudo' may result in syntax or file permission errors
# that prevent sudo from running.
#
# See the sudoers man page for the details on how to write a sudoers file.
#
# Host alias specification
# User alias specification
# Cmnd alias specification
# Defaults specification
# Runas alias specification
# User privilege specification
root ALL=(ALL) ALL
# Uncomment to allow people in group wheel to run all commands
%wheel ALL=(ALL) ALL
# Same thing without a password
%wheel ALL=(ALL) NOPASSWD: ALL
# Samples
%users ALL=/sbin/mount /cdrom,/sbin/umount /cdrom
%users localhost=/sbin/shutdown -h now
=================================================================
snapshot0-MSEC-system-security-and-audit.png

snapshot1-Basic+security.png

snapshot2-System-security-top.png

snapshot3-System-security-bottom.png

snapshot4-Network-security.png

snapshot5-Periodic-checks.png

snapshot6-Periodic-checks-bottom.png

snapshot7-Exceptions(none).png
.png)
snapshot8-Permissions(all).png
.png)
snapshot9-Users-and-Groups.png

snapshot10-Users-and-Groups-bottom.png

snapshot11-Groups-bottom.png

snapshot12-Groups-top.png

Don't forget to reboot for permission changes for groups and sudo.
I hope this helps you, Regards Glenn :-)
Hi, I've read some discussions here and elsewhere about Mandriva security and the use of sudo.
As well as editing /etc/sudoers, and making yourself ($USER) part of the wheel group, you may require a tighter security than that of the default Mandriva system setup.
Warning! This is a one user system, so some selections may not apply to your system, be careful, if you don't know what a setting does Leave it at the default.
I've been using Mandriva for a few years now, and I generally do these tasks mentioned here, with every update of sudo and the MSEC tool packages.
To be honest I don't know where the config file is for MSEC, and that may be just as well. ;-)
[code]/etc/security/msec[/code]
So to ease my fingers and kb, I have snapshots (.png) of the settings I have made.
After you've done all of this, a reboot is required to put the settings in place, ( like sudo
and group changes).
/etc/sudoers
===========================================================================
# sudoers file.
#
# This file MUST be edited with the 'visudo' command as root.
# Failure to use 'visudo' may result in syntax or file permission errors
# that prevent sudo from running.
#
# See the sudoers man page for the details on how to write a sudoers file.
#
# Host alias specification
# User alias specification
# Cmnd alias specification
# Defaults specification
# Runas alias specification
# User privilege specification
root ALL=(ALL) ALL
# Uncomment to allow people in group wheel to run all commands
%wheel ALL=(ALL) ALL
# Same thing without a password
%wheel ALL=(ALL) NOPASSWD: ALL
# Samples
%users ALL=/sbin/mount /cdrom,/sbin/umount /cdrom
%users localhost=/sbin/shutdown -h now
=================================================================
snapshot0-MSEC-system-security-and-audit.png

snapshot1-Basic+security.png

snapshot2-System-security-top.png

snapshot3-System-security-bottom.png
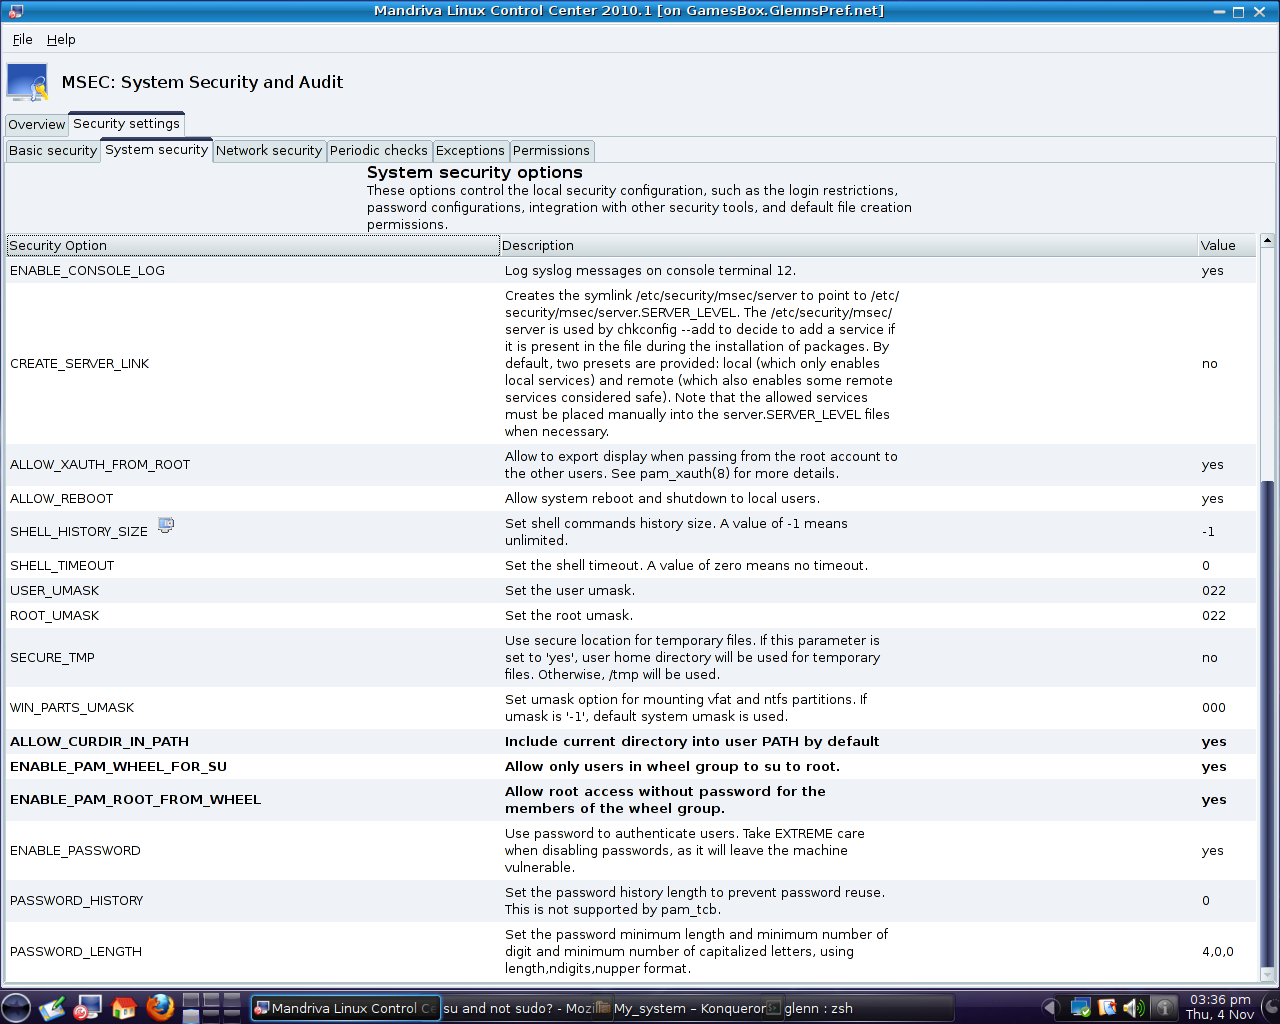
snapshot4-Network-security.png

snapshot5-Periodic-checks.png

snapshot6-Periodic-checks-bottom.png

snapshot7-Exceptions(none).png
.png)
snapshot8-Permissions(all).png
.png)
snapshot9-Users-and-Groups.png

snapshot10-Users-and-Groups-bottom.png

snapshot11-Groups-bottom.png

snapshot12-Groups-top.png

Don't forget to reboot for permission changes for groups and sudo.
I hope this helps you, Regards Glenn :-)
28 May 2010
What I'm reading
electonics docs (.pdf)... http://www.analogzone.com/tech_fram.htm
Understanding Qigong
What is Qigong?
The Human Qi Circulatory System
by Dr. Yang, Jwing-Ming
Phylosophy... http://www.vl-site.org/taoism/index.html
in particular.... http://www.vl-site.org/taoism/ttcstan1.html
Understanding Qigong
What is Qigong?
The Human Qi Circulatory System
by Dr. Yang, Jwing-Ming
Phylosophy... http://www.vl-site.org/taoism/index.html
in particular.... http://www.vl-site.org/taoism/ttcstan1.html
Your most basic Human Rights
Seems I've said, or restated, this else where, time it was here too.
Your most basic Human Rights.
You have the right to...
be treated with respect,
make mistakes,
say NO and not feel guilty,
experience and express your feelings,
take time to slow down and think,
change your mind,
do less than you are humanly capable of,
ask for information,
feel good about your self.
;-)
Your most basic Human Rights.
You have the right to...
be treated with respect,
make mistakes,
say NO and not feel guilty,
experience and express your feelings,
take time to slow down and think,
change your mind,
do less than you are humanly capable of,
ask for information,
feel good about your self.
;-)
14 May 2010
How to recover lost mp3's for free
Glenn Waller May 2010
How to recover lost mp3's for free.
suitable for one user system users, administrators and technicians
time to do? 45Min approx.
programs used,
GNU/Linux (Mandriva 2010.1) Kernel 2.6.32.3-2mnb_x86_64
Photorec partition data recovery tool
find to list and sort files
EasyTag to recover file names from tags
You'll need root access to use Photorec, su or sudo to root in your shell, type in the root password if required. I think it's because of access to raw (unmounted) file system data. The files will be written as (user and group) root, so we fix the permission changes during this tutorial (you need root access to do this too) back to user-name group and user before doing too much more. This way we can use user-land instead of having to stay as root for long periods of time.
Scenario
Msec was deleting unowned files in the /home partition
moved mp3's off etx3 partition to fat32 partition to share whilst working within windows xp land
and out of Msec's long hands. Eventually I had no access to the files permissions from
GNU/Linux. During previous attempts to fix the permission problem, I had copied the data off the
disk, changed the attributes under ext4 (this time), formatted the disk and copied the...data.....ack.
anyway, it didn't work.
The task begins.
Being a long time advocate for Photorec in the past, (recovering music from old damaged cdroms) I knew I could (probably) almost certainly recover the music files from the ext4 formatted partition. There were also a lot of other files on there too, like a backup of HalfLife2 CC:S downloads and games, maps, etc, about 8.5 to 12 gig, and much more.
First things first, you need a partition equal to or greater than in size of the partition you wish to recover. Next you need to run Photorec from the directory from where you wish to store the files Photorec finds. So, make a directory on the partition you are using for the recovered files and cd to the recovery directory, like this (you'll need to change the absolute address to match your folder names)
[code]
mkdir /home/glenn/storage/recovery
cd /home/glenn/storage/recovery
Unmount the drive the data is being recovered from, (/home/glenn/stuff in my case)
/etc/fstab...
# Entry for /dev/sdb9 :
UUID=ef444615-fcc7-438d-8711-57fc1571b4c1 /home/glenn/stuff ext4 relatime 1 2
check /etc/fstab in a text file reader, like cat. # Entry for /dev/sdb9 :
sudo umount /dev/sdb9
If you can't unmount the drive you may be able to use a bootable GNU/Linux flash-stick, like slax and knoppix live distributions.
I pulled up Photorec on the screen, cli mode, type 'photorec' at the prompt. (reminder, you need to be root)
What is displayed on the screen is a list of physical drives on the system, navigate with the cursor keys and select(hit enter to continue) the drive the data you want to recover may be found (Last Know Address). Make sure you highlight the drive selection, with the up and down arrows and select continue or abort with the left or right arrows, to save unintentional aborting.
The next screen list some details about the drive, continue to the next section about the partition table types, I have a PC and selected the Intel platform. (please don't ask me about the other partition types, I don't know) Now here it gets to the partition level, a note of warning...
Be Careful Here it's easy to begin the recovery of ALL the data on the partition, but I only want songs mp3, wav, ogg, and pictures bmp, jpg, gif, png.
So if you only want certain file types, select 'options' down near the bottom of the partition list (we'll select the partition after we set the file extension filter)
Here you can set the paranoia mode, low ram, and other setting better suited to Forensic file recovery. I usually leave this at the defaults, we just want to do a late backup.
Hit enter to 'quit'.
Scroll across to the 'File Opt' tab and enter into the extension list. Using the arrow keys and space bar to mark the grid for the types you want Photorec to search for.
“Press s for default selection, b to save the settings”
Saving this creates a file that may be called again when you next use Photorec (as root).
Once you had a good search through the list and marked the file types you want return to the partition page and use the arrows to scroll down to the partition you want, in my case .../sdb9.
Photorec is now ready to start, if you are ready highlight the 'search' function and hit enter. You should see a list of file types appear on the screen, they appear as they are found, so don't abort if you don't see the file types you selected in 'File Opt' as soon as it starts. It should also display how long it will take to complete the search. The files still remain on the old partition too in case you need to search harder. Photorec took 21 min to scan 54gig of data spread over a 73Gb partition. And save them neatly in the present working directory (/home/glenn/storage/recovery)
This is the end screen of a “second scan” without 'File Opt' being edited, approx 28minutes
PhotoRec 6.11, Data Recovery Utility, April 2009
Christophe GRENIER
http://www.cgsecurity.org
Disk /dev/sdb - 250 GB / 232 GiB (RO) - ATA WDC WD2500AAKS-0
Partition Start End Size in sectors
9 L Linux 20859 1 1 30400 254 63 153292167 [stuff]
17647 files saved in /home/glenn/storage/recovery/recup_dir directory.
Recovery completed.
txt: 8728 recovered
mp3: 3345 recovered
mpg: 2351 recovered
gif: 1513 recovered
jpg: 944 recovered
flv: 524 recovered
mov: 91 recovered
png: 77 recovered
ogg: 60 recovered
gpg: 6 recovered
others: 8 recovered
you need to quit each page until you are back in the bare shell.
Post-recovery clean-up
Prior to sorting and renaming, and the last job we need to do as root, is change the file permissions to my user and group. In my case, user glenn and group glenn with chown and chmod to make them readable,writeable and executable.
[code]
sudo chown -hR glenn:glenn /home/glenn/storage/recovery
#change user and group to glenn
sudo chmod -R 775 /home/glenn/storage/recovery
#make writeable by a program and user
…..type exit and hit enter to quit the shell as root.
Using find to list and sort files
ref. Shawn Hermans
I wanted to copy all the mp3 files to a directory and also filter off the files I thought would be too small to be useful as an mp3 with any quality, I set it for 2Mb 2048kb's and also made a dir small for the small files that I would not bother renaming.
[code]
mkdir /home/glenn/storage/recovery/mp3
mkdir /home/glenn/storage/recovery/small
find does not use the standard sequence off directives in GNU/Linux
use 'man find' and 'man xargs' to get the lowdown on these tools. Type q to quit at any time from the man page.
Excerpt from man find...find uses 'find source arguments expression destination'...
NON-BUGS
$ find . -name *.c -print
find: paths must precede expression
Usage: find [-H] [-L] [-P] [-Olevel] [-D help|tree|search|stat|rates|opt|exec] [path...] [expression]
This happens because *.c has been expanded by the shell resulting in find actually receiving a
command line like this:
find . -name bigram.c code.c frcode.c locate.c -print
That command is of course not going to work. Instead of doing things this way, you should
enclose the pattern in quotes or escape the wildcard:
$ find . -name '*.c' -print
$ find . -name \*.c -print
The xargs manpage reveals more on how the find command works....
man xargs excerpt...
EXAMPLES
find /tmp -name core -type f -print | xargs /bin/rm -f
Find files named core in or below the directory /tmp and delete them. Note that this will
work incorrectly if there are any filenames containing newlines or spaces.
find /tmp -name core -type f -print0 | xargs -0 /bin/rm -f
Find files named core in or below the directory /tmp and delete them, processing filenames in
such a way that file or directory names containing spaces or newlines are correctly handled.
find /tmp -depth -name core -type f -delete
Find files named core in or below the directory /tmp and delete them, but more efficiently
than in the previous example (because we avoid the need to use fork(2) and exec(2) to launch
rm and we don't need the extra xargs process).
Oh, and the i means [-i[replace-str]] Replace string
Because of type setting and formatting of text I tried to use a back-slash (\) here to continue code lines, It's not very effective in the my zshell, bash may be different. You may need to copy the lines to a text editor like kate to edit/join them up, just one space is enough, and no spaces at the end. ;-)
find /home/glenn/storage/recovery/ -name "*.mp3" | xargs -i mv {} /home/glenn/storage/recovery/mp3/
find /home/glenn/storage/recovery/ -name "*.ogg" | xargs -i mv {} /home/glenn/storage/recovery/mp3/
find /home/glenn/storage/recovery/ -name "*.wav" | xargs -i mv {} /home/glenn/storage/recovery/mp3/
This code moves files from the mp3 directory that are less than 2048kb (2Mb) Most 2.5 to 3 minute mp3s are about +2.5Mb
minimum file size...
find /home/glenn/storage/recovery/mp3/ -name "*.mp3" -size -2048k | xargs -i mv {} /home/glenn/storage/recovery/small/
find /home/glenn/storage/recovery/mp3/ -name "*.ogg" -size -2048k | xargs -i mv {} /home/glenn/storage/recovery/small/
find /home/glenn/storage/recovery/mp3/ -name "*.wav" -size -2048k | xargs -i mv {} /home/glenn/storage/recovery/small/
Now, we have sorted the files we want to work with from the files we don't want to bother with.
Next we want to get most of our file names back, For this I found EasyTag, a a tag search like mp3info with a very handy bulk scanning and renaming tool with a graphical user interface.
Example of reading data tags with mp3info...
mp3info -F /home/glenn/storage/recovery/mp3/f81018974.mp3
File: /home/glenn/storage/recovery/mp3/f81018974.mp3
Title: The River Track: 6
Artist: Bruce Springsteen & The E Stre
Album: Live In New York City (Disc 1) Year: 2001
Comment: Genre: Other [12]
Retrieving Filenames
ref. http://easytag.sourceforge.net/ EasyTag 2.1.6
http://en.wikipedia.org/wiki/EasyTag
Using Mandriva 'urpmi easytag' will install the package.
Dependencies....
Checking the sourceforge site for EasyTag, the dependent libraries are listed as such
The program depends on the following libraries:
GTK 2.4,
id3lib to handle MP3 files,
libogg,
libvorbis for Ogg Vorbis files,
libFLAC (with libogg and libvorbis) for FLAC Vorbis files,
mpeg4ip for MP4 files.
urpmi installed the package EasyTag with no questions, but due to previous experience I went ahead and checked to see if I could find them. I did not find them all, some of the library names have changed and some were plain missing. I used a combination of locate, urpmq and urpmf to search for the libs and subsequent dependants. And also “Install and Remove Software” to see the info on the package I could not find. Here are my findings... an explanation follows...
EasyTag deps....
#GTK 2.4,
#id3lib to handle MP3 files, (optional, except to write ID3v2.3 tags in MP3 files),
#libogg,
#libvorbis forsupport for Ogg Vorbis and flac files,
#libFLAC (with libogg and libvorbis) support for FLAC Vorbis files,
#mpeg4ip support MP4/ACC file
#libid3tag(required)
#libxcb-xlib
#lib64amrnb3
#lib64arts1
#lib64mpeg4ip0
#lib64xvid4
#end deps list (may not be complete)glib-devel?
!!!!!!!!!!!!!!!!!!!!!!!!!!!!!!!!!!!!!!!!!!!!!!!!!!!!!!!!!!!!!!!!!!!!!!!!!!!!!!!!!!
libs
# libavcodec.so.51
#locate libavcodec.so.5
#copy and rename
#/usr/lib/libavcodec.so.52
#/usr/lib/libavcodec.so.52.66.0
#copy and rename
sudo cp /usr/lib64/libavcodec.so.52 /usr/lib64/libavcodec.so.51
#/usr/lib64/libavcodec.so.52.66.0
# package-lib64ffmpeg52
# libdirect-1.0.so.0
#copy and rename
#locate libdirect-1
#/usr/lib64/libdirect-1.2.so.0
#/usr/lib64/libdirect-1.2.so.0.8.0
sudo cp /usr/lib64/libdirect-1.4.so.0 /usr/lib64/libdirect-1.0.so.0
#/usr/lib64/libdirect-1.4.so.0.3.0
# package-lib64directfb1.4, install previous versions of the 1.4 packages first.
#because the latest ver of the package only has the shared files, not the libs.
#libdirectfb-1.0.so.0 locate libdirectfb-1
#copy and rename
sudo cp /usr/lib64/libdirectfb-1.4.so.0 /usr/lib64/libdirectfb-1.0.so.0 #/usr/lib64/libdirectfb-1.2.so.0.8.0
#/usr/lib64/libdirectfb-1.4.so.0
#/usr/lib64/libdirectfb-1.4.so.0.3.0
# libfusion-1.0.so.0
#locate libfusion-1
sudo cp /usr/lib64/libfusion-1.2.so.0 /usr/lib64/libfusion-1.0.so.0
#/usr/lib64/libfusion-1.2.so.0.8.0
#/usr/lib64/libfusion-1.4.so.0
#/usr/lib64/libfusion-1.4.so.0.3.0
# libmp4v2.so.0
#locate libmp4v2
#copy and rename
sudo cp /usr/lib64/libmp4v2.so.1 /usr/lib64/libmp4v2.so.0
#/usr/lib64/libmp4v2.so.1.9.1
# libxcb-xlib.so.0, libxcb-res0 replaces this package
#copy and rename
#locate libxcb-res
#/usr/lib64/libxcb-res.la
#/usr/lib64/libxcb-res.so
sudo cp /usr/lib64/libxcb-res.so.0 /usr/lib64/libxcb-xlib.so.0
#/usr/lib64/libxcb-res.so.0.0.0
The majority of the problem libraries were version labels, except one that I found had a replacement with a new name, so effectively these libs just needed renaming to allow the program EasyTag to work. I've left the required lines uncommented(#). You will need root access to change these files. I thought about linking the files rather than copying them with new names and decided that at the rate of development with Mandriva and GNU/Linux in general it would make little difference to my system, but feel free to experiment (ln and ln -s instead of cp) This way, at least, the system should be able to find and use the libs when called by the program.
In short...
sudo cp /usr/lib64/libavcodec.so.52 /usr/lib64/libavcodec.so.51
sudo cp /usr/lib64/libdirect-1.4.so.0 /usr/lib64/libdirect-1.0.so.0
sudo cp /usr/lib64/libdirectfb-1.4.so.0 /usr/lib64/libdirectfb-1.0.so.0
sudo cp /usr/lib64/libfusion-1.2.so.0 /usr/lib64/libfusion-1.0.so.0
sudo cp /usr/lib64/libmp4v2.so.1 /usr/lib64/libmp4v2.so.0
sudo cp /usr/lib64/libxcb-res.so.0 /usr/lib64/libxcb-xlib.so.0
Using the EasyTag program
When first started the program offers little until a directory has been scanned. Make sure the directory is writeable by the user (you) and the select the folder in the browser section of the window. EasyTag will now scan the files for the tag information of all the available files in that directory, don't worry it won't do anything else yet. Now the buttons for options appear usable. The directory I used (/home/glenn/storage/recovery/mp3) has 2775 files that were recovered from the formatted disk, some of which were deleted by MSEC.
Go to the 'scanner' menu and select 'Rename file/s and directory', this shows a dialogue where you can type or select from the drop down list what tags to search for (and in what order) and eventually use for renaming. Check the website for details. Also the settings for the scanner and re-namer are available here too, and by selecting the 'Scanner Options' icon, the settings panel appears. I have not changed much here, except to replace the %20 strings with a space. A helpful information comment appears when the mouse cursor is over an option to help understanding. I have chosen create directory-name/file-name, %a - %b/%n - %t. (%a = Artist, %b = Album, %n = Track number, %t = Title) On revision, %a/%b/%n-%t, may suit better, artist/album/track-filename. ;-) That's what I use now. :-)
This process takes much longer, but is required to read the tags from the files. Once it has finished, do not go to the 'file' menu and 'select all', It Crashes the program, Instead go to the 'file' menu and select 'sort by tag', 'browse results by artist'. Select a group of files by one artist then select 'save'. This should rename the files and create directories for the files, from the tags. Repeat this action for all of the individual artists. That tool care of 80% of my files and saved me a lot of time. To clean up the rest (about 600 files) I used Kde's Amarok. Here I listened to the files and renamed them, amazingly, Amarok had some of the tags right before I started. Cool, more time saved.
I'm still sorting through the list, many of the files are from Hl2/CS:S background sounds.
I hope this helps you too. :-)
Cheers and Regards Glenn
How to recover lost mp3's for free.
suitable for one user system users, administrators and technicians
time to do? 45Min approx.
programs used,
GNU/Linux (Mandriva 2010.1) Kernel 2.6.32.3-2mnb_x86_64
Photorec partition data recovery tool
find to list and sort files
EasyTag to recover file names from tags
You'll need root access to use Photorec, su or sudo to root in your shell, type in the root password if required. I think it's because of access to raw (unmounted) file system data. The files will be written as (user and group) root, so we fix the permission changes during this tutorial (you need root access to do this too) back to user-name group and user before doing too much more. This way we can use user-land instead of having to stay as root for long periods of time.
Scenario
Msec was deleting unowned files in the /home partition
moved mp3's off etx3 partition to fat32 partition to share whilst working within windows xp land
and out of Msec's long hands. Eventually I had no access to the files permissions from
GNU/Linux. During previous attempts to fix the permission problem, I had copied the data off the
disk, changed the attributes under ext4 (this time), formatted the disk and copied the...data.....ack.
anyway, it didn't work.
The task begins.
Being a long time advocate for Photorec in the past, (recovering music from old damaged cdroms) I knew I could (probably) almost certainly recover the music files from the ext4 formatted partition. There were also a lot of other files on there too, like a backup of HalfLife2 CC:S downloads and games, maps, etc, about 8.5 to 12 gig, and much more.
First things first, you need a partition equal to or greater than in size of the partition you wish to recover. Next you need to run Photorec from the directory from where you wish to store the files Photorec finds. So, make a directory on the partition you are using for the recovered files and cd to the recovery directory, like this (you'll need to change the absolute address to match your folder names)
[code]
mkdir /home/glenn/storage/recovery
cd /home/glenn/storage/recovery
Unmount the drive the data is being recovered from, (/home/glenn/stuff in my case)
/etc/fstab...
# Entry for /dev/sdb9 :
UUID=ef444615-fcc7-438d-8711-57fc1571b4c1 /home/glenn/stuff ext4 relatime 1 2
check /etc/fstab in a text file reader, like cat. # Entry for /dev/sdb9 :
sudo umount /dev/sdb9
If you can't unmount the drive you may be able to use a bootable GNU/Linux flash-stick, like slax and knoppix live distributions.
I pulled up Photorec on the screen, cli mode, type 'photorec' at the prompt. (reminder, you need to be root)
What is displayed on the screen is a list of physical drives on the system, navigate with the cursor keys and select(hit enter to continue) the drive the data you want to recover may be found (Last Know Address). Make sure you highlight the drive selection, with the up and down arrows and select continue or abort with the left or right arrows, to save unintentional aborting.
The next screen list some details about the drive, continue to the next section about the partition table types, I have a PC and selected the Intel platform. (please don't ask me about the other partition types, I don't know) Now here it gets to the partition level, a note of warning...
Be Careful Here it's easy to begin the recovery of ALL the data on the partition, but I only want songs mp3, wav, ogg, and pictures bmp, jpg, gif, png.
So if you only want certain file types, select 'options' down near the bottom of the partition list (we'll select the partition after we set the file extension filter)
Here you can set the paranoia mode, low ram, and other setting better suited to Forensic file recovery. I usually leave this at the defaults, we just want to do a late backup.
Hit enter to 'quit'.
Scroll across to the 'File Opt' tab and enter into the extension list. Using the arrow keys and space bar to mark the grid for the types you want Photorec to search for.
“Press s for default selection, b to save the settings”
Saving this creates a file that may be called again when you next use Photorec (as root).
Once you had a good search through the list and marked the file types you want return to the partition page and use the arrows to scroll down to the partition you want, in my case .../sdb9.
Photorec is now ready to start, if you are ready highlight the 'search' function and hit enter. You should see a list of file types appear on the screen, they appear as they are found, so don't abort if you don't see the file types you selected in 'File Opt' as soon as it starts. It should also display how long it will take to complete the search. The files still remain on the old partition too in case you need to search harder. Photorec took 21 min to scan 54gig of data spread over a 73Gb partition. And save them neatly in the present working directory (/home/glenn/storage/recovery)
This is the end screen of a “second scan” without 'File Opt' being edited, approx 28minutes
PhotoRec 6.11, Data Recovery Utility, April 2009
Christophe GRENIER
http://www.cgsecurity.org
Disk /dev/sdb - 250 GB / 232 GiB (RO) - ATA WDC WD2500AAKS-0
Partition Start End Size in sectors
9 L Linux 20859 1 1 30400 254 63 153292167 [stuff]
17647 files saved in /home/glenn/storage/recovery/recup_dir directory.
Recovery completed.
txt: 8728 recovered
mp3: 3345 recovered
mpg: 2351 recovered
gif: 1513 recovered
jpg: 944 recovered
flv: 524 recovered
mov: 91 recovered
png: 77 recovered
ogg: 60 recovered
gpg: 6 recovered
others: 8 recovered
you need to quit each page until you are back in the bare shell.
Post-recovery clean-up
Prior to sorting and renaming, and the last job we need to do as root, is change the file permissions to my user and group. In my case, user glenn and group glenn with chown and chmod to make them readable,writeable and executable.
[code]
sudo chown -hR glenn:glenn /home/glenn/storage/recovery
#change user and group to glenn
sudo chmod -R 775 /home/glenn/storage/recovery
#make writeable by a program and user
…..type exit and hit enter to quit the shell as root.
Using find to list and sort files
ref. Shawn Hermans
I wanted to copy all the mp3 files to a directory and also filter off the files I thought would be too small to be useful as an mp3 with any quality, I set it for 2Mb 2048kb's and also made a dir small for the small files that I would not bother renaming.
[code]
mkdir /home/glenn/storage/recovery/mp3
mkdir /home/glenn/storage/recovery/small
find does not use the standard sequence off directives in GNU/Linux
use 'man find' and 'man xargs' to get the lowdown on these tools. Type q to quit at any time from the man page.
Excerpt from man find...find uses 'find source arguments expression destination'...
NON-BUGS
$ find . -name *.c -print
find: paths must precede expression
Usage: find [-H] [-L] [-P] [-Olevel] [-D help|tree|search|stat|rates|opt|exec] [path...] [expression]
This happens because *.c has been expanded by the shell resulting in find actually receiving a
command line like this:
find . -name bigram.c code.c frcode.c locate.c -print
That command is of course not going to work. Instead of doing things this way, you should
enclose the pattern in quotes or escape the wildcard:
$ find . -name '*.c' -print
$ find . -name \*.c -print
The xargs manpage reveals more on how the find command works....
man xargs excerpt...
EXAMPLES
find /tmp -name core -type f -print | xargs /bin/rm -f
Find files named core in or below the directory /tmp and delete them. Note that this will
work incorrectly if there are any filenames containing newlines or spaces.
find /tmp -name core -type f -print0 | xargs -0 /bin/rm -f
Find files named core in or below the directory /tmp and delete them, processing filenames in
such a way that file or directory names containing spaces or newlines are correctly handled.
find /tmp -depth -name core -type f -delete
Find files named core in or below the directory /tmp and delete them, but more efficiently
than in the previous example (because we avoid the need to use fork(2) and exec(2) to launch
rm and we don't need the extra xargs process).
Oh, and the i means [-i[replace-str]] Replace string
Because of type setting and formatting of text I tried to use a back-slash (\) here to continue code lines, It's not very effective in the my zshell, bash may be different. You may need to copy the lines to a text editor like kate to edit/join them up, just one space is enough, and no spaces at the end. ;-)
find /home/glenn/storage/recovery/ -name "*.mp3" | xargs -i mv {} /home/glenn/storage/recovery/mp3/
find /home/glenn/storage/recovery/ -name "*.ogg" | xargs -i mv {} /home/glenn/storage/recovery/mp3/
find /home/glenn/storage/recovery/ -name "*.wav" | xargs -i mv {} /home/glenn/storage/recovery/mp3/
This code moves files from the mp3 directory that are less than 2048kb (2Mb) Most 2.5 to 3 minute mp3s are about +2.5Mb
minimum file size...
find /home/glenn/storage/recovery/mp3/ -name "*.mp3" -size -2048k | xargs -i mv {} /home/glenn/storage/recovery/small/
find /home/glenn/storage/recovery/mp3/ -name "*.ogg" -size -2048k | xargs -i mv {} /home/glenn/storage/recovery/small/
find /home/glenn/storage/recovery/mp3/ -name "*.wav" -size -2048k | xargs -i mv {} /home/glenn/storage/recovery/small/
Now, we have sorted the files we want to work with from the files we don't want to bother with.
Next we want to get most of our file names back, For this I found EasyTag, a a tag search like mp3info with a very handy bulk scanning and renaming tool with a graphical user interface.
Example of reading data tags with mp3info...
mp3info -F /home/glenn/storage/recovery/mp3/f81018974.mp3
File: /home/glenn/storage/recovery/mp3/f81018974.mp3
Title: The River Track: 6
Artist: Bruce Springsteen & The E Stre
Album: Live In New York City (Disc 1) Year: 2001
Comment: Genre: Other [12]
Retrieving Filenames
ref. http://easytag.sourceforge.net/ EasyTag 2.1.6
http://en.wikipedia.org/wiki/EasyTag
Using Mandriva 'urpmi easytag' will install the package.
Dependencies....
Checking the sourceforge site for EasyTag, the dependent libraries are listed as such
The program depends on the following libraries:
GTK 2.4,
id3lib to handle MP3 files,
libogg,
libvorbis for Ogg Vorbis files,
libFLAC (with libogg and libvorbis) for FLAC Vorbis files,
mpeg4ip for MP4 files.
urpmi installed the package EasyTag with no questions, but due to previous experience I went ahead and checked to see if I could find them. I did not find them all, some of the library names have changed and some were plain missing. I used a combination of locate, urpmq and urpmf to search for the libs and subsequent dependants. And also “Install and Remove Software” to see the info on the package I could not find. Here are my findings... an explanation follows...
EasyTag deps....
#GTK 2.4,
#id3lib to handle MP3 files, (optional, except to write ID3v2.3 tags in MP3 files),
#libogg,
#libvorbis forsupport for Ogg Vorbis and flac files,
#libFLAC (with libogg and libvorbis) support for FLAC Vorbis files,
#mpeg4ip support MP4/ACC file
#libid3tag(required)
#libxcb-xlib
#lib64amrnb3
#lib64arts1
#lib64mpeg4ip0
#lib64xvid4
#end deps list (may not be complete)glib-devel?
!!!!!!!!!!!!!!!!!!!!!!!!!!!!!!!!!!!!!!!!!!!!!!!!!!!!!!!!!!!!!!!!!!!!!!!!!!!!!!!!!!
libs
# libavcodec.so.51
#locate libavcodec.so.5
#copy and rename
#/usr/lib/libavcodec.so.52
#/usr/lib/libavcodec.so.52.66.0
#copy and rename
sudo cp /usr/lib64/libavcodec.so.52 /usr/lib64/libavcodec.so.51
#/usr/lib64/libavcodec.so.52.66.0
# package-lib64ffmpeg52
# libdirect-1.0.so.0
#copy and rename
#locate libdirect-1
#/usr/lib64/libdirect-1.2.so.0
#/usr/lib64/libdirect-1.2.so.0.8.0
sudo cp /usr/lib64/libdirect-1.4.so.0 /usr/lib64/libdirect-1.0.so.0
#/usr/lib64/libdirect-1.4.so.0.3.0
# package-lib64directfb1.4, install previous versions of the 1.4 packages first.
#because the latest ver of the package only has the shared files, not the libs.
#libdirectfb-1.0.so.0 locate libdirectfb-1
#copy and rename
sudo cp /usr/lib64/libdirectfb-1.4.so.0 /usr/lib64/libdirectfb-1.0.so.0 #/usr/lib64/libdirectfb-1.2.so.0.8.0
#/usr/lib64/libdirectfb-1.4.so.0
#/usr/lib64/libdirectfb-1.4.so.0.3.0
# libfusion-1.0.so.0
#locate libfusion-1
sudo cp /usr/lib64/libfusion-1.2.so.0 /usr/lib64/libfusion-1.0.so.0
#/usr/lib64/libfusion-1.2.so.0.8.0
#/usr/lib64/libfusion-1.4.so.0
#/usr/lib64/libfusion-1.4.so.0.3.0
# libmp4v2.so.0
#locate libmp4v2
#copy and rename
sudo cp /usr/lib64/libmp4v2.so.1 /usr/lib64/libmp4v2.so.0
#/usr/lib64/libmp4v2.so.1.9.1
# libxcb-xlib.so.0, libxcb-res0 replaces this package
#copy and rename
#locate libxcb-res
#/usr/lib64/libxcb-res.la
#/usr/lib64/libxcb-res.so
sudo cp /usr/lib64/libxcb-res.so.0 /usr/lib64/libxcb-xlib.so.0
#/usr/lib64/libxcb-res.so.0.0.0
The majority of the problem libraries were version labels, except one that I found had a replacement with a new name, so effectively these libs just needed renaming to allow the program EasyTag to work. I've left the required lines uncommented(#). You will need root access to change these files. I thought about linking the files rather than copying them with new names and decided that at the rate of development with Mandriva and GNU/Linux in general it would make little difference to my system, but feel free to experiment (ln and ln -s instead of cp) This way, at least, the system should be able to find and use the libs when called by the program.
In short...
sudo cp /usr/lib64/libavcodec.so.52 /usr/lib64/libavcodec.so.51
sudo cp /usr/lib64/libdirect-1.4.so.0 /usr/lib64/libdirect-1.0.so.0
sudo cp /usr/lib64/libdirectfb-1.4.so.0 /usr/lib64/libdirectfb-1.0.so.0
sudo cp /usr/lib64/libfusion-1.2.so.0 /usr/lib64/libfusion-1.0.so.0
sudo cp /usr/lib64/libmp4v2.so.1 /usr/lib64/libmp4v2.so.0
sudo cp /usr/lib64/libxcb-res.so.0 /usr/lib64/libxcb-xlib.so.0
Using the EasyTag program
When first started the program offers little until a directory has been scanned. Make sure the directory is writeable by the user (you) and the select the folder in the browser section of the window. EasyTag will now scan the files for the tag information of all the available files in that directory, don't worry it won't do anything else yet. Now the buttons for options appear usable. The directory I used (/home/glenn/storage/recovery/mp3) has 2775 files that were recovered from the formatted disk, some of which were deleted by MSEC.
Go to the 'scanner' menu and select 'Rename file/s and directory', this shows a dialogue where you can type or select from the drop down list what tags to search for (and in what order) and eventually use for renaming. Check the website for details. Also the settings for the scanner and re-namer are available here too, and by selecting the 'Scanner Options' icon, the settings panel appears. I have not changed much here, except to replace the %20 strings with a space. A helpful information comment appears when the mouse cursor is over an option to help understanding. I have chosen create directory-name/file-name, %a - %b/%n - %t. (%a = Artist, %b = Album, %n = Track number, %t = Title) On revision, %a/%b/%n-%t, may suit better, artist/album/track-filename. ;-) That's what I use now. :-)
This process takes much longer, but is required to read the tags from the files. Once it has finished, do not go to the 'file' menu and 'select all', It Crashes the program, Instead go to the 'file' menu and select 'sort by tag', 'browse results by artist'. Select a group of files by one artist then select 'save'. This should rename the files and create directories for the files, from the tags. Repeat this action for all of the individual artists. That tool care of 80% of my files and saved me a lot of time. To clean up the rest (about 600 files) I used Kde's Amarok. Here I listened to the files and renamed them, amazingly, Amarok had some of the tags right before I started. Cool, more time saved.
I'm still sorting through the list, many of the files are from Hl2/CS:S background sounds.
I hope this helps you too. :-)
Cheers and Regards Glenn
How to save your rpm's for future reuse in Mandriva.
How to save your rpm's for future reuse in Mandriva. By Glenn Waller 28th April 2010.
Why did I decide to reuse the downloaded rpm's (Redhat Package Management)?
To save time, connectivity problems (Internet) Bandwidth and embarrassment after I broke the system. I have added my scripts with explanations to the end of this paper but they are customised for my system, so read and edit them before trying to use them. ;-)
How I started reusing the saved rpm's.
Including, Mandriva installation choice of copying the data to HD, before the package selection process, was saved in /var/ftp/pub/mandriva(ver)...
Mostly, back then it was for large packages that I would reuse, such as the kernel-source (50Mb, approx) and the plf (Mandriva's Penguin Liberation Front) rpm's for video codecs.
Then I found genhdlist and soon after genhdlist2, and wrote a bunch of commands to a text-file and made a shell script out of it.
I partitioned my hard-drives to give me some space that would not be formatted during an install, Mandy generally requires formatting of /usr and / (root). This maybe a GNU/Linux requirement across the board of the many distributions (distros)
After I found genhdlist2 was I able to usefully add my local repositions (repos) to drakRPM, to make them available when using smart-packager and urpm(i), And reuse them at will, regardless of when I broke it and, and keep moving forward.
Using the no-clean hack in the GUI has never been reliable on my system, as it seems to reset it's self after each invocation of the program. So I took a different track, I wanted to save the rpms while at the same time being able to view the selected packages and dependencies (deps) before committing to the changes.
So, I would painstakingly copy and paste the confirmation text from Drakrpm to a plain text file and remove the new-line and dash+space at the beginning of each new line to create a space separated list that urpmi could work with. After the copy and paste and before running the list with urpmi –noclean I would close Drakrpm cancelling the process, but my list of packages was safe, and usable.
I still have not figured out how to keep the signatures for the packages, although I have tried using some guides from the web. But I guess if they were fine when initially downloaded, they'll still be fine unless I get a hard-drive error, which has not occurred for quite some time (Fingers crossed).
The list was generally discarded after use, generally because of the gross amount of redundant files I would end up with, sometimes it would take upto an hour to edit the list (1340 odd packages, lines) so I've been hunting for a way to make this more expedient and reliable. And I found sed.
Editing the list was accomplished from the bottom to the top, so I was not continually working at the end of the line, but the beginning of the line to save scrolling, with the mouse to high-light the characters I wanted/needed to remove and the space bar.
“Two hands, two guns!” (sifu Malcolm Sue)
Now with all of that it only takes a second to convert the list and I can enjoy my time doing what ever else I like.
I hope someone else finds this helpful, cheers and kind regards, Glenn (GlennsPref@gmail.com)
Scripts with explanations....
The first was a backup script which only collected the downloaded rpms from /var/cache /urpmi/rpms to a directory safe within /home/glenn/....I have many partitions, don't know why, Maybe just because I can, lol.
glenn@GamesBox:~$ df
Filesystem Size Used Avail Use% Mounted on
/dev/sda5 20G 1.8G 17G 10% /
/dev/sda1 92M 59M 28M 68% /boot
/dev/sda14 383G 232G 151G 61% /home
/dev/sdc7 33G 176M 33G 1% /home/glenn/local/Music
/dev/sdd5 52G 180M 52G 1% /home/glenn/local/Video
/dev/sdb8 73G 61G 13G 84% /home/glenn/local/spare
/dev/sdc1 56G 180M 55G 1% /home/glenn/local/stuff
/dev/sdb7 34G 31G 2.9G 92% /home/glenn/local/vm1
/dev/sdb9 74G 51G 23G 69% /home/glenn/stuff
/dev/sdb1 22G 13G 9.4G 57% /media/win_c
/dev/sdd6 31G 14G 18G 44% /media/win_c2
/dev/sdb6 29G 19G 9.8G 66% /media/win_d
/dev/sdd7 63G 23G 41G 36% /media/win_d2
/dev/sda11 5.0G 138M 4.6G 3% /opt
/dev/sda8 8.0G 157M 7.4G 3% /tmp
/dev/sda7 9.9G 5.3G 4.1G 57% /usr
/dev/sda10 5.0G 139M 4.6G 3% /usr/local
/dev/sdc6 20G 520M 18G 3% /usr/src
/dev/sda6 20G 911M 18G 5% /var
/dev/sdc5 3.5G 72M 3.3G 3% /var/ftp
/dev/sda13 5.0G 139M 4.6G 3% /var/spool
/dev/sda12 2.0G 56M 1.9G 3% /var/www
glenn@GamesBox:~$
That is all it did.
Of course to simplify the editing of this script, it calls other scripts that do most of the work,
and it's still a “work in progress”(wip). It has some text to put up on the screen to give some
feedback to the user of what stage the process is up to, and although some of them are duplicated in the other scrips, it works quite well (IMHO).
#! /bin/zsh
#echo "/home/glenn/bin/backup-rpms"
echo "/home/glenn/bin/backup-rpms"
echo
sudo sh /home/glenn/build/rpms/organise-rpms
echo "call organise-rpms....."
echo "Backup-rpms"
#echo "generating new hdlist.cz for local archives........"
sudo sh /home/glenn/build/rpms/gen-hdlist2
echo
echo "Backup-rpms"
echo "rebuilding local rpm and file databases... this might take a while ........"
sudo rpm --rebuilddb && sudo updatedb
echo
echo "Backup-rpms"
echo "local database up to date ........"
echo
echo
sudo sh /home/glenn/build/rpms/update-rpm-database
echo "run rpm -qa | sort | less > /home/glenn/build/note-rpm-installed-list-`date +%Y-%m-%d-%H`.txt, maybe upto 15kb text."/n
sudo rpm -qa | sort | less > /home/glenn/build/note-rpm-installed-list-`date +%Y-%m-%d-%H`.txt
echo "run rpm -Va | grep miss & send to /home/glenn/build/anote-rpm-Va-grep-miss-list-`date +%Y-%m-%d-%H`.txt"
sudo rpm -Va | grep miss > /home/glenn/build/anote-rpm-Va-grep-miss-list-`date +%Y-%m-%d-%H`.txt
echo "clean rpm cache"
sudo smart clean
sudo rm -rf /var/cache/urpmi/rpms/*rpm
echo ""
echo "all repositories are now up to date, any errors? see above!"
date && whoami
The first thing it does is call organise-rpms from ~/build/rpms...
sudo sh /home/glenn/build/rpms/organise-rpms
This script finds rpms where they maybe stored by me, and the programs DrakRPM and
Smart. (I really like Smart, it is a synaptic-like package manager although it has been changed over
the years, and is now much more useful, but harder to hack, like saving the rpms (Grief)).[/code]
#! /bin/zsh
#echo "/home/glenn/build/rpms/organise-rpms"
echo "organise-rpms"
echo "Called by, ~/bin/backup-rpms"
echo "organising saved rpm cache for local archives....."
#1st Level
sudo mv -v /var/cache/urpmi/rpms/*2010.0*rpm /home/glenn/local/Archive/2010.0/noarch/
sudo mv -v /var/cache/urpmi/rpms/*2010.1*rpm /home/glenn/local/Archive/2010.1/noarch/
sudo cp -v /var/lib/smart/packages/*2010.0*rpm /home/glenn/local/Archive/2010.0/noarch/
sudo cp -v /var/lib/smart/packages/*2010.1*rpm /home/glenn/local/Archive/2010.1/noarch/
sudo mv -v /var/cache/urpmi/rpms/*rpm /home/glenn/local/Archive/2010.1/noarch/
sudo cp -v /var/lib/smart/packages/*rpm /home/glenn/local/Archive/2010.1/noarch/
sudo mv -v /home/glenn/Download/*rpm /home/glenn/local/Archive/2010.1/noarch/
sudo mv -v /home/glenn/Download/packagesNsource/*rpm
echo "filter for 2010.1 packages"
sudo mv -v /home/glenn/local/Archive/2010.1/noarch/*2010.0.x86_64.rpm /home/glenn/local/Archive/2010.0/x86_64/
sudo mv -v /home/glenn/local/Archive/2010.1/x86_64/*mdv2010.1.noarch.rpm /home/glenn/local/Archive/2010.1/noarch/
sudo mv -v /home/glenn/local/Archive/2010.1/x86_64/*plf2010*.rpm /home/glenn/local/Archive/2010.1/plf/
sudo mv -v /home/glenn/local/Archive/2010.1/noarch/*plf2010*.rpm /home/glenn/loca/Archive/2010.1/plf/
sudo mv -v /home/glenn/local/Archive/2010.0/noarch/*4.3.8*mdv2010.1.x86_64.rpm/home/glenn/local/Archive/2010.1/kde/
sudo mv -v /home/glenn/local/Archive/2010.0/noarch/*4.3.8*mdv2010.1.x86_64.rpm/home/glenn/local/Archive/2010.1/kde/
sudo mv -v /home/glenn/local/Archive/2010.0/noarch/*4.3.8*mdv2010.1.x86_64.rpm/home/glenn/local/Archive/2010.1/kde/
sudo mv -v /home/glenn/local/Archive/2010.0/kde430/*4.3.8*mdv2010.1.x86_64.rpm/home/glenn/local/Archive/2010.1/kde/
sudo mv -v /home/glenn/local/Archive/2010.0/kde430/*mdv2010.1.noarch.rpm /home/glenn/local/Archive/2010.1/noarch/
sudo mv -v /home/glenn/local/Archive/2010.1/x86_64/*4.3.8*mdv2010.1.x86_64.rpm/home/glenn/local/Archive/2010.1/kde/
sudo mv -v /home/glenn/local/Archive/2010.1/noarch/*4.3.8*mdv2010.1.x86_64.rpm/home/glenn/local/Archive/2010.1/kde/
sudo mv -v /home/glenn/local/Archive/2010.0/noarch/*mdv2010.1.noarch.rpm /home/glenn/local/Archive/2010.1/noarch/
sudo mv -v /home/glenn/local/Archive/2010.0/i586/*mdv2010.1.i586.rpm /home/glenn/local/Archive/2010.1/i586/
echo "cleanup-stagglers"
sudo mv -v /home/glenn/local/Archive/2010.1/noarch/*2010.1.x86_64.rpm /home/glenn/local/Archive/2010.1/x86_64/
sudo mv -v /home/glenn/local/Archive/2010.1/noarch/*2010.1.i586.rpm /home/glenn/loca/Archive/2010.1/i586/
sudo mv -v /home/glenn/local/Archive/2010.0/noarch/*4.3.8*mdv2010.1.x86_64.rpm/home/glenn/local/Archive/2010.1/kde/
sudo mv -v /home/glenn/local/Archive/2010.0/noarch/*plf2010.1.x86_64.rpm /home/glenn/local/Archive/2010.1/plf/
sudo mv -v /home/glenn/local/Archive/2010.0/noarch/*plf2010.0.x86_64.rpm /home/glenn/local/Archive/2010.0/plf/
sudo mv -v /home/glenn/local/Archive/2010.1/noarch/*mdv2010.0.noarch.rpm /home/glenn/local/Archive/2010.0/noarch/
sudo mv -v /home/glenn/local/Archive/2010.0/x86_64/*2010.0.noarch.rpm /home/glenn/local/Archive/2010.0/noarch/
sudo mv -v /home/glenn/local/Archive/2010.1/x86_64/*2010.1.noarch.rpm /home/glenn/local/Archive/2010.1/noarch/
sudo mv -v /home/glenn/local/Archive/2010.0/contrib/*.*mnb*.x86_64.rpm /home/glenn/local/Archive/2010.1/x86_64/
sudo mv -v /home/glenn/local/Archive/2010.0/noarch/*.*mnb*.x86_64.rpm /home/glenn/local/Archive/2010.1/x86_64/
sudo mv -v /home/glenn/local/Archive/2010.0/x86_64/*.*mnb*.x86_64.rpm /home/glenn/local/Archive/2010.1/x86_64/
sudo mv -v /home/glenn/local/Archive/2010.1/noarch/*.*mnb*.x86_64.rpm /home/glenn/local/Archive/2010.1/x86_64/
sudo mv -v /home/glenn/local/Archive/2010.1/contrib/*.*mnb*.x86_64.rpm /home/glenn/local/Archive/2010.1/x86_64/
sudo mv -v /home/glenn/local/Archive/2010.1/plf/*.*mnb*.x86_64.rpm /home/glenn/local/Archive/2010.1/x86_64/
sudo mv -v /home/glenn/local/Archive/2010.1/i386/*.*mnb*.x86_64.rpm /home/glenn/local/Archive/2010.1/x86_64/
sudo mv -v /home/glenn/local/Archive/2010.1/i586/*.*mnb*.x86_64.rpm /home/glenn/local/Archive/2010.1/x86_64/
sudo mv -v /home/glenn/local/Archive/2010.0/contrib/*.*mnb*.noarch.rpm /home/glenn/local/Archive/2010.1/noarch/
sudo mv -v /home/glenn/local/Archive/2010.0/noarch/*.*mnb*.noarch.rpm /home/glenn/local/Archive/2010.1/noarch/
sudo mv -v /home/glenn/local/Archive/2010.0/x86_64/*.*mnb*.noarch.rpm /home/glenn/local/Archive/2010.1/noarch/
sudo mv -v /home/glenn/local/Archive/2010.1/noarch/*.*mnb*.noarch.rpm /home/glenn/local/Archive/2010.1/noarch/
sudo mv -v /home/glenn/local/Archive/2010.1/x86_64/*.*mnb*.noarch.rpm /home/glenn/local/Archive/2010.1/noarch/
date && whoami
This script also calls another file to change the permissions so I can use them with out errors
such as read-only.
#! /bin/zsh
echo "Backup-rpms"
echo "~/build/rpms/rpms-chmod"
sudo chmod -R 755 /home/glenn/local/Archive/2009.0/
sudo chmod -R 755 /home/glenn/local/Archive/2009.1/
sudo chmod -R 755 /home/glenn/local/Archive/2010.0/
sudo chmod -R 755 /home/glenn/local/Archive/2010.1/
date && whoami
Next the script calls for genhdlist2 to recreate the files required for DrakRPM and Smart
package data-bases, hdlist.cz
#! /bin/zsh
echo "Backup-rpms"
echo "generating new hdlist.cz for local archives........"
echo ""
echo "Backup-rpms"
echo "generating new hdlist.cz for local archives........"
# echo "Backup-rpms local/Archive/2009.0/i386"
# sudo genhdlist2 --xml-info -v --allow-empty-media /home/glenn/local/Archive/2009.0/i386
# echo "Backup-rpms local/Archive/2009.1/noarch"
# sudo genhdlist2 --xml-info -v /home/glenn/local/Archive/2009.1/noarch
# echo "Backup-rpms local/Archive/2009.1/i586"
# sudo genhdlist2 --xml-info -v /home/glenn/local/Archive/2009.1/i586
# echo "Backup-rpms local/Archive/2009.1/i586/contrib"
# sudo genhdlist2 --clean --xml-info -v /home/glenn/local/Archive/2009.1/i586/contrib
# echo "Backup-rpms local/Archive/2009.1/i386"
# sudo genhdlist2 --xml-info -v --allow-empty-media /home/glenn/local/Archive/2009.1/i386
# echo "Backup-rpms local/Archive/2009.1/x86_64"
# sudo genhdlist2 --clean --xml-info -v /home/glenn/local/Archive/2009.1/x86_64
# echo "Backup-rpms local/Archive/2009.1/kde430"
# sudo genhdlist2 --clean --xml-info -v /home/glenn/local/Archive/2009.1/kde430
# echo "Backup-rpms local/Archive/2009.1/x86_64/contrib"
# sudo genhdlist2 --xml-info -v /home/glenn/local/Archive/2009.1/x86_64/contrib
echo "Backup-rpms 2010.0"
sudo genhdlist2 --clean --xml-info -v /home/glenn/local/Archive/2010.0/x86_64
sudo genhdlist2 --clean --xml-info -v /home/glenn/local/Archive/2010.0/noarch
sudo genhdlist2 --clean --xml-info -v /home/glenn/local/Archive/2010.0/i586
sudo genhdlist2 --clean --xml-info -v /home/glenn/local/Archive/2010.0/i386
sudo genhdlist2 --clean --xml-info -v /home/glenn/local/Archive/2010.0/contrib
echo "Backup-rpms 2010.1"
sudo genhdlist2 --clean --xml-info -v /home/glenn/local/Archive/2010.1/x86_64
sudo genhdlist2 --clean --xml-info -v /home/glenn/local/Archive/2010.1/noarch
sudo genhdlist2 --clean --xml-info -v /home/glenn/local/Archive/2010.1/i586
sudo genhdlist2 --clean --xml-info -v /home/glenn/local/Archive/2010.1/i386
sudo genhdlist2 --clean --xml-info -v --allow-empty-media /home/glenn/local/Archive/2010.1/contrib
sudo genhdlist2 --clean --xml-info -v /home/glenn/local/Archive/2010.1/kde
echo "Backup-rpms plf"
# sudo genhdlist2 --clean --xml-info -v /home/glenn/local/Archive/2009.0/plf
# sudo genhdlist2 --clean --xml-info -v /home/glenn/local/Archive/2009.1/plf
sudo genhdlist2 --clean --xml-info -v /home/glenn/local/Archive/2010.0/plf
sudo genhdlist2 --clean --xml-info -v --allow-empty-media /home/glenn/local/Archive/2010.1/plf
echo "GenHdList2 up to date!"
date && whoami
As new versions of Mandy come out, new lines are added and the old ones removed, as seen
above (#) commented out...
If genhdlist finds a corrupted package it stops and shows and error, naming the package,
thanks!
Next it refreshes the rpm database of installed packages, and the find data-base too.
rpm --rebuilddb && sudo updatedb
This takes a while....
The next task is to update the external rpm repo data-bases....
#! /bin/zsh
#echo "/home/glenn/bin/backup-rpms"
echo "/home/glenn/build/rpms/update-rpm-database"
echo "Called from, ~/bin/backup-rpms"
echo
echo
echo
echo
echo "updating urpmi rpm database....."
echo
echo
echo
#echo "urpmi.update local repos"
#sudo urpmi.update local
#echo "uncomment lines to run update all, skipped for now, GW"
echo "urpmi.update all"
sudo urpmi.update -a
#echo "smart update"
#sudo smart update
echo
echo "Backup-rpms"
#echo "local repositories are up to date .. GamesBox.GlennsPref.net........Have a nice day!"
echo "urpmi is up to date .. GamesBox.GlennsPref.net........Have a nice day!"
date && whoami
smart update is no longer required, as it reads the URPM data-bases
The last things to run is a clean up, and checking for missing packages and a catalogue of
installed rpms for the system.
sudo rpm -qa | sort | less > /home/glenn/build/note-rpm-installed-list-`date +%Y-%m-%d-%H`.txt
echo "run rpm -Va | grep miss & send to /home/glenn/build/anote-rpm-Va-grep-miss-list-`date +%Y-%m-%d-%H`.txt"
sudo rpm -Va | grep miss > /home/glenn/build/anote-rpm-Va-grep-miss-list-`date +%Y-%m-%d-%H`.txt
echo "clean rpm cache"
sudo smart clean
sudo rm -rf /var/cache/urpmi/rpms/*rpm
rpm -Va | grep miss, takes a while to finish, but can be well worth the wait, before rebooting and
having a crash or cli only system because of a missing dep or lib.
The output is redirected to a file and the file name is created with the date and hour it was
written.
Now the reason I written this is because of a sed trick I found that converts the list to
something urpmi can work with, This process is not completed yet, more things will occur to me as time rolls on,
#!/bin/zsh
echo "Create a space-separated-list from top-down list with preceeding chars."
cd ~/build
echo "remove old files"
rm -f ~/build/file2.txt
rm -f ~/build/file3.txt
echo "Remove - (dash space) from lead of lines using sed...."
echo "sed 's/^[-\ ]*//' file1.txt (from file1.txt in pwd dir)"
echo "redirect output to new file...file2.txt"
sed 's/^[-\ ]*//' file1.txt > file2.txt
echo "Now replace carriage returns with a space... using file2.txt, create file3.txt"
sed ':a;N;$!ba;s/\n/ /g' file2.txt > file3.txt
First it removes the old files, to save stopping for errors, file exists.
Then it removes the dash space from the head of the lines...
And lastly it replaces the newline char with a space, bringing all the list to one line, sweet!
I'd like to reference where most of my info came from,
MDE repo http://www.mde.djura.org/index.html and
SoS repo http://seerofsouls.com/ (website down atm), help files...
Few years old now but still very useful.
http://sed.sourceforge.net/sed1line.txt
And that's IT!
Any questions? Did I miss something? Please ask!
Regards Glenn.
29 April 2010
20 March 2009
Hospital Results
The results from the hospital were inconclusive, but the good news is I don't have cancer.
They want to do more tests later.
After speaking with my doctor I decided to go ahead with the tests.
They were forecast to take place in April, but due to uni I want to put it off for a while.
Semester break perhaps.
They want to do more tests later.
After speaking with my doctor I decided to go ahead with the tests.
They were forecast to take place in April, but due to uni I want to put it off for a while.
Semester break perhaps.
27 January 2009
Results of Hospital Visit Postphoned
I won't get the results till Feb 20, now. After the doctor reported he could not attend the Jan 30 appointment.
22 January 2009
Making Real-time audio, with Mandriva Linux and Rolands Edirol UA-25ex (usb powered sound card), using jackd
Making Real-time audio with
Mandriva Linux and Roland's
Edirol UA-25ex (usb powered sound card), using
jackd, qjackctl, Ardour, Hydrogen, Rosegarden and fluidsynth.
Mandriva Linux and Roland's
Edirol UA-25ex (usb powered sound card), using
jackd, qjackctl, Ardour, Hydrogen, Rosegarden and fluidsynth.
Topical Index
Objective
Current system Hardware
Find appropriate Kernel
rpm's info and choice
I used a perl script to check my system, ref. http://arnout.engelen.eu/files/dev/linuxmusicians/realTimeConfigQuickScan.pl
Patching the kernel
Preparations.
Manual (diy) Edirol Patch by blablack, ref. http://ubuntuforums.org/archive/index.php/t-908845.html
Manual (diy) RT Patch(Linux Journal video)ref. http://www.linuxjournal.com/video/hyper-low-latency-audio-real-time-kernel
Configure the kernel, (use Gentoo guide...)http://proaudio.tuxfamily.org/wiki/index.php?title=Howto_RT_Kernel
Compile and install the Kernel
Give apps real time access, install and configure set_rlimits
Run perl script check edit files to comply with script
Reconfigure and compile if required.
Test recording in Ardour with Hydrogen Drums controlled by jackd (not documented yet, but it works for me)
Current system Hardware
Find appropriate Kernel
rpm's info and choice
I used a perl script to check my system, ref. http://arnout.engelen.eu/files/dev/linuxmusicians/realTimeConfigQuickScan.pl
Patching the kernel
Preparations.
Manual (diy) Edirol Patch by blablack, ref. http://ubuntuforums.org/archive/index.php/t-908845.html
Manual (diy) RT Patch(Linux Journal video)ref. http://www.linuxjournal.com/video/hyper-low-latency-audio-real-time-kernel
Configure the kernel, (use Gentoo guide...)http://proaudio.tuxfamily.org/wiki/index.php?title=Howto_RT_Kernel
Compile and install the Kernel
Give apps real time access, install and configure set_rlimits
Run perl script check edit files to comply with script
Reconfigure and compile if required.
Test recording in Ardour with Hydrogen Drums controlled by jackd (not documented yet, but it works for me)
Objective
To achieve real time monitoring of multi track sound recording on a personal computer
with Open Source Software. We will probably have to compile twice or more,
until all the requirements are met, so
don't worry if you miss something the first time through.
Current System Hardware
My system, Mandriva 2009.0 official release kde4.1.3(mdv)
Asus M3n78-EH AM2 motherboard,
2x 1gig kingston 800mHz DDR2, AMD64x2 5600+,
Edirol UA-25EX (24/96) usb sound.
nVidia 9800gt 512Mb ddr3 (pci-e x16), Zalman ZM750-HP PSW
numerous usual storage devices.
Find appropriate Kernel, rpm's info and choice
First thing I had to do was get a kernel that supported the new usb audio card.
http://www.edirol.net/products/en/UA-25EX/index.html
I started with the newest available, from Mandriva cooker, 2.6.28 rc...x86_64.(2009.1)
Once I turned off the on-board sound chip in bios, this kernel allowed the device to work
out of the box. (start-up music found it's way to the speakers, without configuring)
But I want Real-Time support!
The new kernel has the Edirol devices already installed. But I want Real-Time support.
I could not get a real-time patch for the new kernel, and to make one is out of my league.
Mandriva has RT type kernels available in .rpm packages from the contrib
and contrib/updates repositories. The real-time patched vanilla kernel...
kernel-rt-source-2.6.26.8-1.rt13.1mdv
The tmb kernel has Mandriva patches and third-party drivers I generally use so I'll start
there as a configuration basis, kernel-tmb-desktop-2.6.26.3-1mdv
Then I will patch the rt-kernel-source with the Edirol patch to get the usb-audio module
to recognise my new sound card.
rpm's info and choice...
The RT kernel is vanilla and has no Mandriva tweaks, so to keep the tweaks I configured the
RT source from the old tmb config file. The versions overlapped in the right order.
kernel-rt-source-2.6.26.8-1.rt13.1mdv - The source code for the Linux kernel
The kernel-rt-source package contains the source code files for the Linux kernel.
The source files are only needed if you want to build your own custom kernel that
is better tuned to your particular hardware.
NOTE: This kernel has no Mandriva patches and no third-party drivers,
only Ingo Molnar -rt (real-time) series patches applied to vanilla kernel.org kernels.
kernel-tmb-desktop-2.6.26.3-1mdv - Linux Kernel for desktop use with x86_64
The kernel package contains the Linux kernel (vmlinuz),
the core of your Mandriva Linux operating system.
The kernel handles the basic functions of the operating system:
memory allocation, process allocation, device input and output, etc.
This kernel is compiled for desktop use, single or multiple x86_64 processor(s)/core(s),
using voluntary preempt, CFS cpu scheduler and cfq i/o scheduler.
This kernel relies on in-kernel smp alternatives to switch between up & smp mode
depending on detected hardware.
To force the kernel to boot in single processor mode, use the "nosmp" boot parameter.
The tmb kernels is an experimental kernel based on the kernel.org kernels with added patches.
Some of them may/will never end up in the main kernels due to their experimental nature.
Some refer to this kernel as a 'hackkernel' ... Use these kernels at your own risk !!
you can do this (install) on a Mandriva system with smart or urpmi, if you have a
current rpm and urpmi database...(for smart too?) Smart is a package manager,
like synaptic, available from the
MDE repos. Ref. http://www.mde.djura.org/index.html (I like it a lot)
smart install kernel-tmb-desktop-2.6.26.3-1mdv kernel-rt-source-2.6.26.8-1.rt13.1mdv
urpmi kernel-tmb-desktop-2.6.26.3-1mdv kernel-rt-source-2.6.26.8-1.rt13.1mdv
Note: I did not install the rt-kernel rpm, just the tmb-kernel and rt-kernel-source rpms,
to save on downloads and to keep the “Mandriva tweaks and proprietary drivers”.
RT= "to bring hard real-time scheduling capabilities to the Linux Kernel,
with worst case latency and code execution in the tens of micro seconds."
(Linux Journal video)ref. http://www.linuxjournal.com/video/hyper-low-latency-audio-real-time-kernel
Note: I use the video also in manually patching the kernel with an rt patch and
setting rt access for the programs. I used that video and this perl script (next)
to set up my system for jackd.
I used a perl script to check my system,
By following this perl program, I found what I needed to change for optimum Audio Response
Check the system with “realTimeConfigQuickScan.pl” ...found here
perl script to report if you need to adjust ticks, or smp, etcetera.
you can run it from another shell terminal, (Konsole has tabs like firefox)
and it just reports to screen what needs to be done. Beautiful!
You can use the shift+PageUp or shift+uparrow to scroll back up the page.
Make a list, although they wont all be kernel config changes, It checks for several things,
"Checking for Ingo Molnar's Real-Time Preemption, Checking for tick less time support, Checking for 1000hz clock, Checking for High Resolution Timers,
Checking filesystem types, Checking tmpfs mounted on /tmp, Checking filesystem 'noatime' parameter, Checking the ability to prioritize processes with (re)nice, Checking whether you're in the 'audio' group, Checking for multiple 'audio' groups, Checking sysctl settings (inotify max_user_watches), Checking for resource-intensive background processes, like kpowersave."
We'll run this check again later to be sure we have everything in it's list.
“to be sure, to be sure!”
Patching the kernel...
Preparations.
Patch the kernel with the Edirol patch.
Patch the kernel with the RT patch.
Patch the kernel with the Edirol patch.
Patch the kernel with the RT patch.
Preparations
Before I configured the kernel it needed to be patched and hacked a bit,
I edited the lines in the new Makefile to reflect the name I wanted to use for my kernel...
and added the Edirol patch to the RT kernel....
vi is a handy editor, We need admin rights to “save these files here”...
su (enter root password)
vi /usr/src/linux/Makefile
Quick vi tute
vi is operated in a shell, like Konsole or term
Quick keys...
I = insert “edit mode”
Esc = exit mode/s
:w = write
:q = quit
:wq! = force write quit (does not always over-ride the admin permissions)
/usr/src/linux/Makefile (Only showing the top 5 lines or so)...
VERSION = 2
PATCHLEVEL = 6
SUBLEVEL = 26
EXTRAVERSION = -music.8-1.rt13.1mdv
NAME = GamesBox.GlennsPref.net
uname -a reveals the details of the running kernel (reflected from the installed kernel),
I don't want them all named “x.x-x-custom-x.x”,
I like task names more than reference numbers in my boot loader,
less geeky, more task oriented.
uname -a
glenn@GamesBox:~/bin$ uname -a (22-01 13:33)
Linux GamesBox.GlennsPref.net 2.6.26-music.8-1.rt13.1mdv #3 SMP PREEMPT RT Wed Jan 14 20:45:45 EST 2009 x86_64 AMD Athlon(tm) 64 X2 Dual CoreProcessor 5600+ GNU/Linux
glenn@GamesBox:~/bin$
Patch the kernel with the Edirol patch.
Copy the lines from the code box below to a file named
/usr/src/linux/sound/usb/Edirol-patch.diff
Change to the directory and run the patch...
cd /usr/src/linux/sound/usb
sudo patch < Edirol-patch.diff Note: When tested (25-01-2009, 12:09), the response was “patching file usbaudio.c Reversed (or previously applied) patch detected! Assume -R? [n]”
I [ctrl+c] to kill the process, Because I installed the patch before this demo.
I believe this process of "how and where to patch" the kernel is concise now.
The Edirol UA-25EX Patch code...
ref. http://ubuntuforums.org/archive/index.php/t-908845.html
Copy all text in the next frame...(except the html tags, "blockquote") ;-)
Edirol-patch.diff
Add Alsa support for Roland Edirol UA-4FX in Advanced mode
(for MIDI support and sample rates of 48 kHz and 96 kHz)
usbaudio.c, usbquirks.h
Signed-off-by: david.c.hubbard@gmail.com
===================================================================
diff -u sound/usb/usbaudio.c.00 sound/usb/usbaudio.c
--- sound/usb/usbaudio.c.00 2007-11-28 02:13:10.000000000 -0700
+++ sound/usb/usbaudio.c 2007-11-28 02:44:47.000000000 -0700
@@ -2930,7 +2930,7 @@
}
/*
- * Create a stream for an Edirol UA-700/UA-25 interface. The only way
+ * Create a stream for an Edirol UA-700/UA-25/UA-4FX interface. The only way
* to detect the sample rate is by looking at wMaxPacketSize.
*/
static int create_ua700_ua25_quirk(struct snd_usb_audio *chip,
@@ -2950,8 +2950,11 @@
struct audioformat *fp;
int stream, err;
- /* both PCM and MIDI interfaces have 2 altsettings */
- if (iface->num_altsetting != 2)
+ /* both PCM and MIDI interfaces have 2 altsettings,
+ * except UA-4FX at 48 kHz, PCM interface has 3 altsettings */
+ if (iface->num_altsetting != 2 &&
+ (chip->usb_id != USB_ID(0x0582, 0x00a3) ||
+ iface->num_altsetting != 3))
return -ENXIO;
alts = &iface->altsetting[1];
altsd = get_iface_desc(alts);
diff -u sound/usb/usbquirks.h.00 sound/usb/usbquirks.h
--- sound/usb/usbquirks.h.00 2007-11-28 02:15:11.000000000 -0700
+++ sound/usb/usbquirks.h 2007-11-28 02:17:51.000000000 -0700
@@ -1311,6 +1311,37 @@
}
},
/* TODO: add Edirol MD-P1 support */
+{ /*
+ * This quirk is for the "Advanced" modes of the Edirol UA-4FX.
+ * If the switch is not in an advanced setting, the UA-4FX has
+ * ID 0x0582/0x00a4 and is standard compliant (no quirks), but
+ * offers only 16-bit PCM at 44.1 kHz and no MIDI.
+ */
+ USB_DEVICE_VENDOR_SPEC(0x0582, 0x00a3),
+ .driver_info = (unsigned long) & (const struct snd_usb_audio_quirk) {
+ .vendor_name = "EDIROL",
+ .product_name = "UA-4FX",
+ .ifnum = QUIRK_ANY_INTERFACE,
+ .type = QUIRK_COMPOSITE,
+ .data = (const struct snd_usb_audio_quirk[]) {
+ {
+ .ifnum = 0,
+ .type = QUIRK_AUDIO_EDIROL_UA700_UA25
+ },
+ {
+ .ifnum = 1,
+ .type = QUIRK_AUDIO_EDIROL_UA700_UA25
+ },
+ {
+ .ifnum = 2,
+ .type = QUIRK_AUDIO_EDIROL_UA700_UA25
+ },
+ {
+ .ifnum = -1
+ }
+ }
+ }
+},
{
/* Roland SH-201 */
USB_DEVICE(0x0582, 0x00ad),
Tip:
Always leave a blank line at the end of config files, so the shell program (zsh, bash, etc)
knows it's a valid end of file (eof). Ensure when you compile your kernel to activate the
module snd_usb_audio [USB_AUDIO]. When you lsmod, it should be in the list.
If you have the RT kernel-source installed, your free to build the kernel, you may need to do
this again, it's ok, it's just time. I had to do the config twice or more before I completed the
exercise, but I think we'll just install each part once. You should still be in the /usr/src/linux
directory.
Type...
make xconfig
go to Device Driver->Sound->Alsa->USB devices and activate the module USB-Audio
(by blablack)
Check with the perl script to be sure...
reference pages...
Patch the kernel with the Edirol patch if required, by blablack,
http://ubuntuforums.org/archive/index.php/t-908845.html
The kernel patch Edirol FA-4x and UA-25ex From the Ubuntu forums...
http://ubuntuforums.org/showthread.php?t=855327
http://ubuntuforums.org/archive/index.php/t-855327.html
links to this alsa wiki page...
http://alsa.opensrc.org/index.php/Edirol_UA-4FX
Which links to the previous ua-25 page.
http://alsa.opensrc.org/index.php/Edirol_UA-25#Device_information
Next is the rt kernel patch...
Note: You only need to do this if you have not installed the rt kernel source from the rpm,
as mentioned above, if you did you can skip this Patching section and continue on to the
configuring the kernel section of this document.
Patch the kernel with the RT patch.
manual patch method,
from the video. (includes applications rt permissions and access with set_rlimits)...
http://www.linuxjournal.com/video/hy...al-time-kernel
download and patch any rt diffs.
I could not find a real-time patch for the new 2.6.28.x-kernel at...
http://rt.et.redhat.com/download/
You might find that you need to revise what kernel .ver you need to use, as I did,
Once I realised this I used the rpm method instead. Same versions, less work and the
“Mandriva tweaks and proprietary drivers”.
Download the patch (a .bz2 file in this case)to an appropriate place...
/usr/src/linux/patch-2.6.26.8-rt13.bz2 (or whatever version you require)
cd to the src dir (or where you saved the file to)...
cd /usr/src/linux
run bzip2 -d for the .bz2 file to unpack it in the src directory...
bzip2 -d patch-2.6.26.8-rt13.bz2
Now patch the kernel by running...
patch -p1 < style="font-weight: bold;">Configuring the kernel
We'll need to configure further, We'll integrate the patch, type...
cd /usr/src/linux
running make oldconfig will only ask NEW questions not answered in the old (current) config
file.(/boot/config)...
make oldconfig
say yes to the real-time preemption question, preempt_rcu and preempt_rcu_Boost
and any deps (none I noticed).
You can say no to the others or leave them as dynamic loading modules.
(depending on the age of this document, Jan-2009)
Some questions may be debugging apps, but generally you really won't want a lot of
low level apps running taking notes and writing reports while you're trying to record and sequence sounds.
So you can probably leave the debugging and kernel hacking out or unchanged if you like.
I turned off “Kernel_Debugging” as a whole.
This Gentoo guide is concise, (ignoring distro centric commands and) look for the selections to
change in the kernel.
http://proaudio.tuxfamily.org/wiki/index.php?title=Howto_RT_Kernel
Once that is finished, you can run the build sequence...
Another way to do this is with with a GUI, make xconfig or make menuconfig
you can get right down to the nitty gritty of selections, with a search function
with your mouse and you can browse around. :-)
cd /usr/src/linux
Note: I would run “make oldconfig” first, answering the questions then save. Then...
make xconfig
or
make menuconfig
check to see if rt has been enabled,
Search for “real-time preemption” and “preempt_rcu” and any deps (preempt_rcu_Boost),
you can probably leave the debugging and kernel hacking out or unchanged if you like.
Make sure the snd_usb_audio module is loaded in the config.
[USB_AUDIO]
I also look for spcaxxx module for my webcam, and option module for usb_storage
“usb hdspa modem”.
I check to see if the agpgart modules are dynamic not static for my amd/nVidia combo.
I also check for write access to ntfs file systems.
Save your config then exit the xconfig app.
make sure you save the config file with the save button/icon and exit xconfig program.
That should save the config file to the default place... /usr/src/linux/somewhere.
You'll see on the shell, “saved config file to....”(Be sure you know where it is).
Config complete.
Compiling the kernel
Note: The rolling of the kernel (compiling) takes longest, up to 2 hours on most machines
It has been recommended to me not to run any other memory or filesystem intensive
applications on the system while the compiling is being carried out.
Otherwise type...
make all && make modules_install && make install
Note: make all, this does... make dep && make clean bzImage modules
Reboot selecting the new kernel, should be automatic with grub2 Mandriva system...
Shutdown -r now
Note: If you want this to run during the night, let say, and to shut down automatically
when the process is complete, type this instead...
make all && make modules_install && make install && shutdown -h now
Then go to work, or bed and check it when you return.
If you get errors, or stoppages, please ask before you reboot to the new kernel,
you can always fall back to the old kernel if you have booting problems.
Other than the package manager references, this is a good guide for any distro...IMO
Gentoo guide...http://proaudio.tuxfamily.org/wiki/index.php?title=Howto_RT_Kernel
Compile complete.
I got this from a Linux-Journal video tutorial(.flv) called
Hyper_Low-Latency_Audio_with_a_Real-Time_Kernel_Linux_Journa.flv
ref. http://www.linuxjournal.com/video/hy...al-time-kernel
To configure the system applications use the alsa examples...
http://alsa.opensrc.org/index.php/Edirol_UA-25#Assigning_audio_system_rights
Get set_rlimits...
(set_rlimits is only one of a few programms that enables this type of functionallity)
http://www.physics.adelaide.edu.au/~jwoithe/set_rlimits-1.3.0.tgz
http://www.physics.adelaide.edu.au/~jwoithe/
“This file sets the maximum priorities which set_rlimits can set for
a given program when executed by a given user or group.
The program specified must include an absolute path.”
Uncompress it with...
tar xf *
Run...
make clean && make
and when your ready to install it, run...
make install
Now get ready with you favourite editor, with root privileges
to edit some system files...
vi is a good one. ;-)
usually /etc/set_rlimits.conf
We want access to the @audio group and any of it's members (or a username),
Note: you should be a member of that group.
The next is the absolute address to the binary, then the nice level, real-time priority,
and memlock for the binary to run in.
/etc/set_rlimits.conf
@audio /usr/bin/jackd nice=-1 rtprio=80 memlock=100000
@audio /usr/bin/qjackctl nice=-1 rtprio=79 memlock=100000
@audio /usr/bin/ardour nice=-1 rtprio=78 memlock=400000
#@audio / =-1 rtprio= memlock=
@audio /usr/bin/hydrogen nice=-1 rtprio=76 memlock=100000
@audio /usr/bin/rosegarden nice=-1 rtprio=75 memlock=100000
@audio /usr/bin/vkeydb nice=-1 rtprio=74 memlock=100000
@audio /usr/bin/qsynth nice=-1 rtprio=73 memlock=100000
/etc/security/limits.conf (if ardour complains about memory limits)
@audio - rtprio 99
@audio - memlock 500000
@audio - nice -10
/etc/sysctl.conf for …
#checking inotify max_user_watches... too small. For Real-time Audio...
#** /proc/sys/fs/inotify/max_user_watches is smaller than 524288
#** increase it by adding 'fs.inotify.max_user_watches = 524288' to /etc/sysctl.conf and rebooting
# For more information, see http://wiki.linuxmusicians.com/doku.php?id=system_configuration#sysctl.conf
fs.inotify.max_user_watches = 524288
and any others mentioned in the perl script, like tmp fs listing.
Set up the server path in qjackctl to read, set_rlimits jackd
I also preceded the music programs commands with this as well, by editing the icon properties.
Type in set_rlimits jackd to start the server from a prompt.
Check with the video and perl script to check everything is as it should be.
There are references to some of the pages I have trolled through to assemble this document,
and you can check those for configuring the kernel, Alsa, and checking the hardware.
Repeated links from above...
Kernel http://proaudio.tuxfamily.org/wiki/index.php?title=Howto_RT_Kernel
Alsa http://ubuntuforums.org/archive/index.php/t-908845.html
Contributed to by the Ubuntu community and Blablack in particular
Note: The UA-4FX page has more command line utility examples for debugging.
http://alsa.opensrc.org/index.php/Edirol_UA-4FX
Which links to the previous ua-25 page.
http://alsa.opensrc.org/index.php/Edirol_UA-25
http://alsa.opensrc.org/index.php/Edirol_UA-25EX
Outcomes
Before starting with jackd
jack with 64 frames per second and a buffer of 4 periods, at 44.1kHz 16bit
latency is about 5.6msec but jack has drop-outs in the audio chain,
X runs... :-(
After set_rlimits jackd
jack with 64 frames per second and a buffer of 2 periods, at 44.1kHz 16bit
gets about 2.6msec, with no x runs
(x runs = audio-processing lock-ups causing drop-outs, caused by resource scheduling).
I try to get in a habit of using one resolution most of the time,
after all, CD quality is still 44.1kHz/16bit.
:-)
Check for basic system sounds, configure kernel for virtualBox and nVidia Graphics
re-installation,
see here for updates...http://www.linuxquestions.org/blog/glennspref-112299/
After going through all of this, you won't want Mandriva Automatically Upgrading
your kernel for you.
To change this behaviour for urpmi (and drakrpm?) go to /etc/urpmi/skip.list
Use the config help in that file, /^kernel*/ you need to be root to save it.
Smart has a version lock, where you can lock packages by version from the smart GUI, nice.
So we have not covered installing the programs, but
I figure there's other documents about that already.
I used Audacity to check the audio recording and playback systems
during the kernel configs. (without jackd running)
Thank you to the contributors of Alsa, Ubuntu, Linux Journal Magazine, www.atomicmpc.com.au
and www.LinuxQuestions.org and you too (for reading).
I have tried to reference others work where I could, and give credit where it is due.
I apologise for any omissions, and accept any useful criticism,
amendments will be made as they become available and or relevant.
Thank you
Regards Glenn (GlennsPref) 27/01/2009
Format and minor changes, 08/02/2009
Subscribe to:
Posts (Atom)
